As with so many things in the basement finishing world, the challenges presented by a basement ceiling are unique to the situation. One of the challenges includes the need for sound resistance of the basement ceiling structure to keep noise from moving between levels of your house; the presence of water supply pipes and drain lines in the ceiling; and the need for the finished ceiling to cover ventilation ducts and beams. Keep the following best practice approaches in mind as you plan your basement ceiling and it’ll pay off. Most homeowners don’t know about these best practices and many contractors are happy to skip over them.
Resilient Channel for Sound Resistance

No one likes to hear noises from other rooms, and sound transmission through the ceiling that separates your basement from the first floor of your house can be particularly annoying. Resilient channel is one easy way to reduce sound transmission in situations where drywall is used for a basement ceiling. Single layers of drywall alone don’t block sound very well. Resilient channel (often just called “resilient” in the trade), are factory-bent strips of metal formed into a trough-shaped profile and fastened to the bottom edge of the joists at the basement ceiling. The resilient fastens to the joists only, while the drywall screws penetrate only into the resilient channel. This creates very minimal connection between the drywall and the joists, greatly reducing sound transmission. It works. There are three main things to remember about resilient channel:
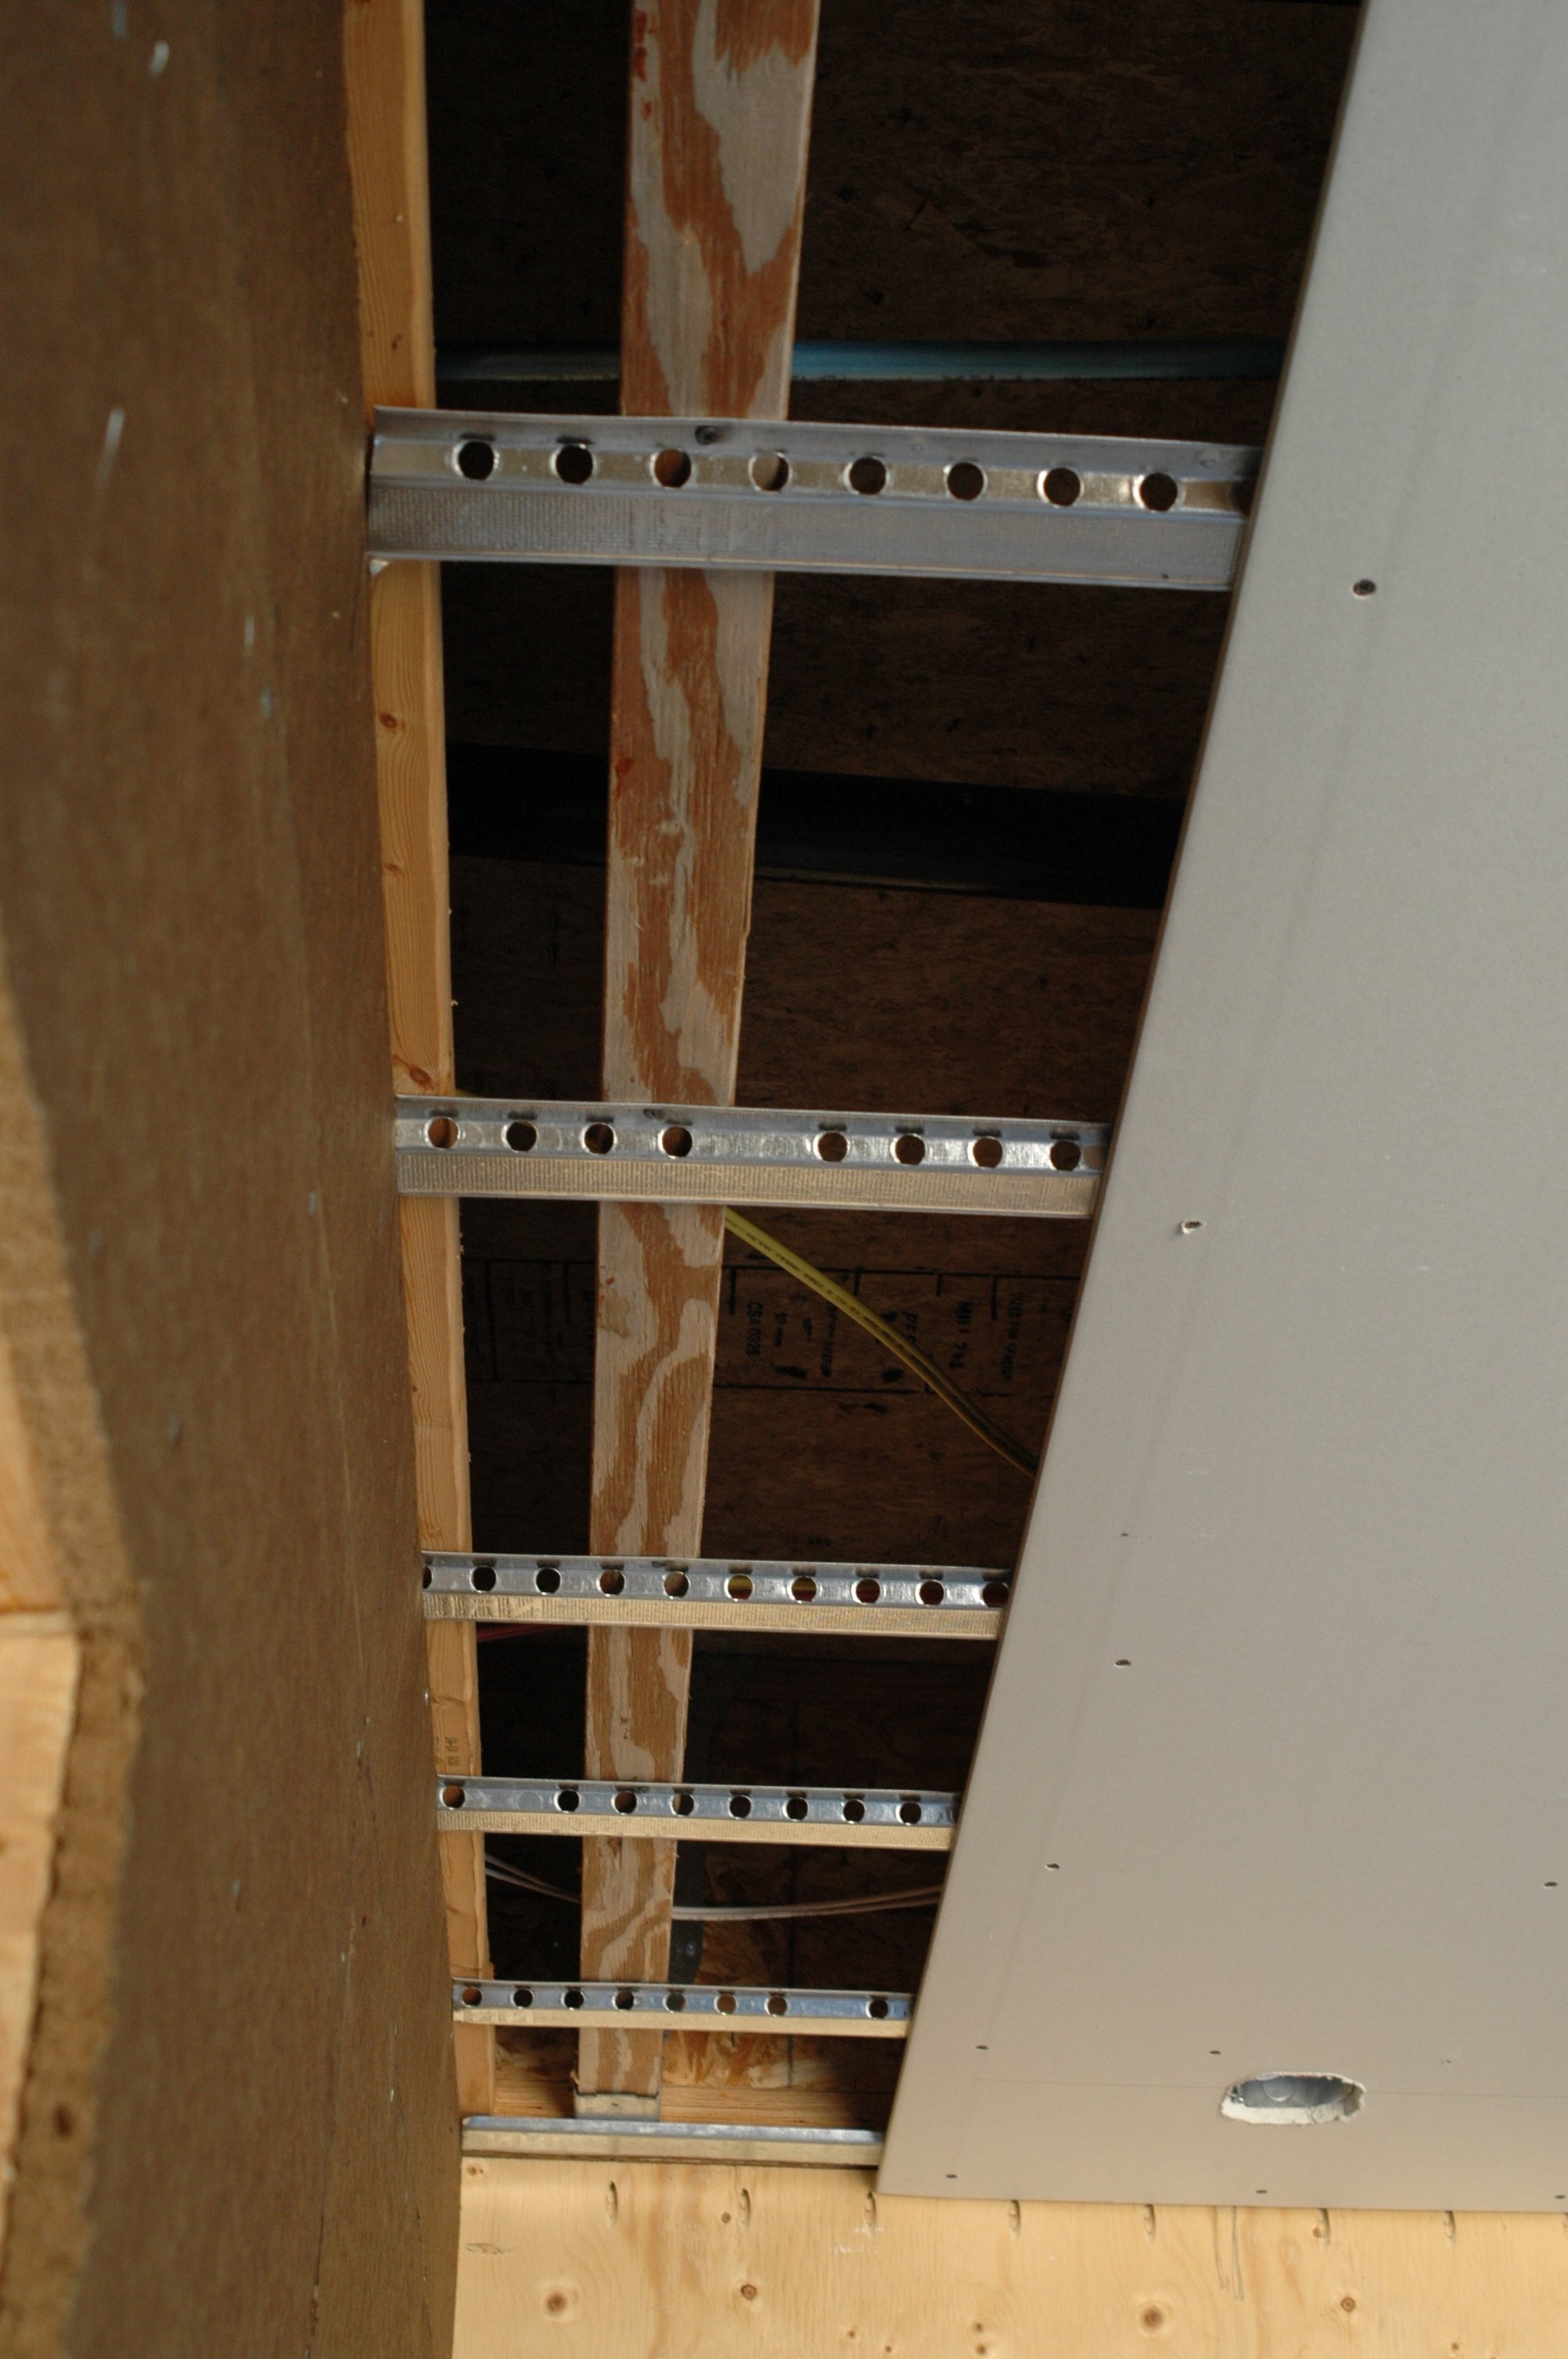
1. Drywall screws must never pass through the drywall and the resilient channel and into the wood. Drywall screws fasten the resilient to the joists only. The drywall is fastened to the resilient only with separate drywall screws. Remember, the idea is to separate the drywall from the wood framing as much as possible.
2. Resilient channel can also be used on walls covered in drywall to boost sound resistance just like it can on ceilings. The resilient seems pretty flimsy when you hold it in your hands, but on a wall, behind drywall, it provides rock solid support to the drywall.
3. Fiberglass or rock wool batts should be installed between the floor joists before the drywall goes on. They don’t need to be “acoustic” batts since thermal batts block sound just as well. That business about “acoustic” is just marketing. Insulation manufacturers have even told me this. My personal preference is Rockwool. It’s a stone wool product (not fiberglass) that’s dense, easy to cut accurately and hardly gives off any dust. It’s much less itchy (not itchy at all, in fact), a lot easier to like than fiberglass and widely available.
+++++++++++++++++
Reality Check: “Soundproofing” Performance
While it’s important to install features to reduce the transmission of unwanted sound to and from your finished basement, you need to be realistic about the results. The commonly used term “soundproofing” is part of the problem. It implies that the complete blocking of sound is possible. That’s not often true in basement situations. Heating ducts, continuous party walls, gaps around light fixtures and other features make it difficult to completely block sound in a basement. You can certainly stop the sound of the TV or stereo from getting very far, but don’t expect the blast from your kids’ rock band to stay downstairs no matter how much “soundproofing” you add to the ceiling.
+++++++++++++++++
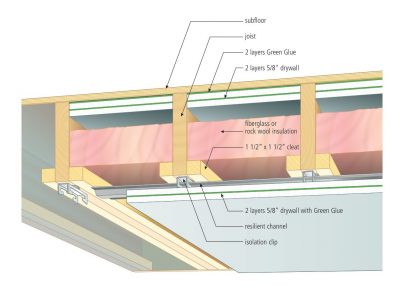
Technically speaking, resilient channel is only one part of an effective approach for reducing sound transmission. Take a look at the illustration and video coming up next to see how various layers of ceiling sound resistance features add more levels of sound resistance depending on what you want. There’s a lot more involved than just resilient channel, though that’s easy to use and effective. The video coming up teaches all about acoustic sealants, low frequency sound insulation and other sound resistance details. There’s more than meets the eye when it comes to boosting sound transmission.
VIDEO: Boosting Sound Resistance of Basement Ceilings
TECH TIP: Sound Resistance and Floors
Standard soundproofing design features like you’ve seen so far for ceilings work well for medium and high-frequency sounds, but not so well for the kind of lower frequency noise caused by people walking upstairs on the floor above the basement. To control this kind of trouble, you need thick rubber underlay. Sound engineers measure the transmission of impact noises like these on a scale called Impact Insulation Class (IIC). A good rating for a residential floor is around 50 IIC, though it’s quite common for unprotected hard surface floors to only reach the high 20s or low 30s IIC. Even if you’re separated from people upstairs by an 8”-thick layer of reinforced concrete floor, the moment there’s a hard surface floor in place up there (as opposed to carpet) you’ll know exactly when the folks upstairs get up to go to the bathroom at night. The solution to these problems is found in the application of a dense, rubber underlay. Typically about 1/4” thick, think of it as high performance audio shock absorbers for your floors.
A handful of different brands of sound-reducing rubber underlay are on the market, but one of the most innovative is manufactured by a North American company called KN Rubber. This company turns more than a million old tires each year into products for automotive and industrial applications, as well as an acoustic rubber floor underlay called QuietDown (www.knrubber.com). If you’re planning to replace the flooring in above-ground sections of your house anyway, the use of rubber underlay will greatly improve the sense of separateness people experience in the finished basement. It’s worth the trouble.
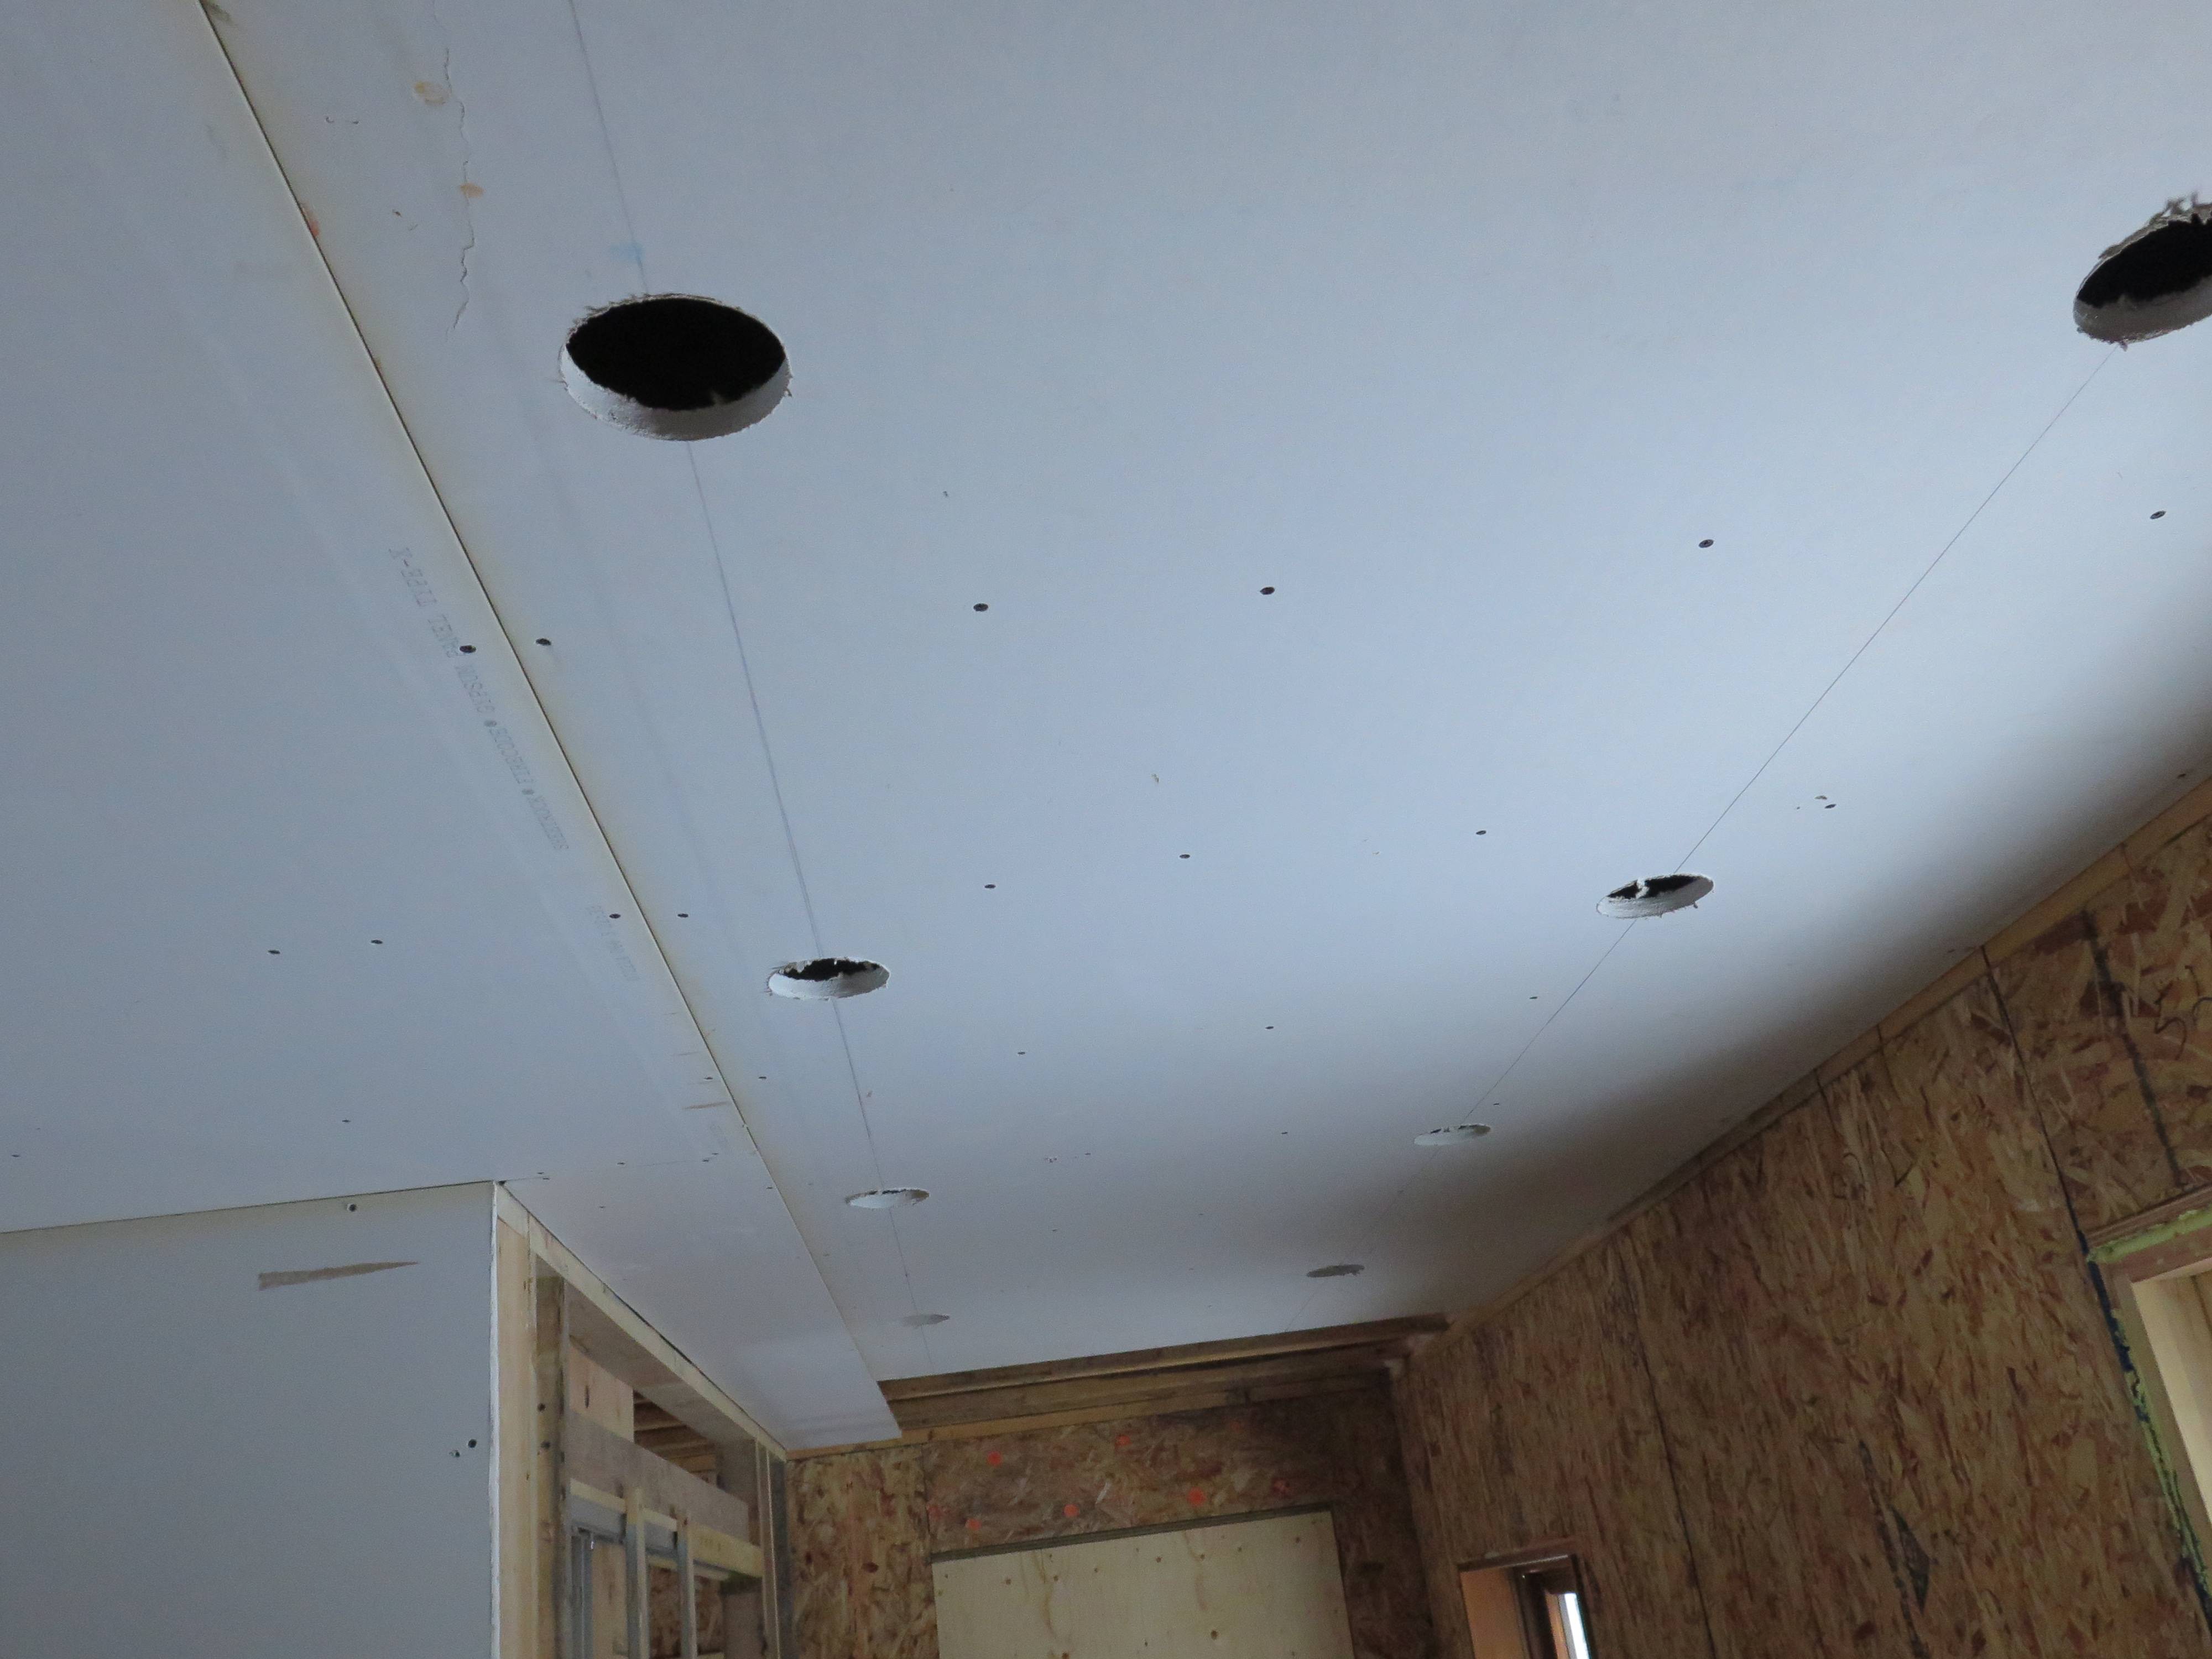
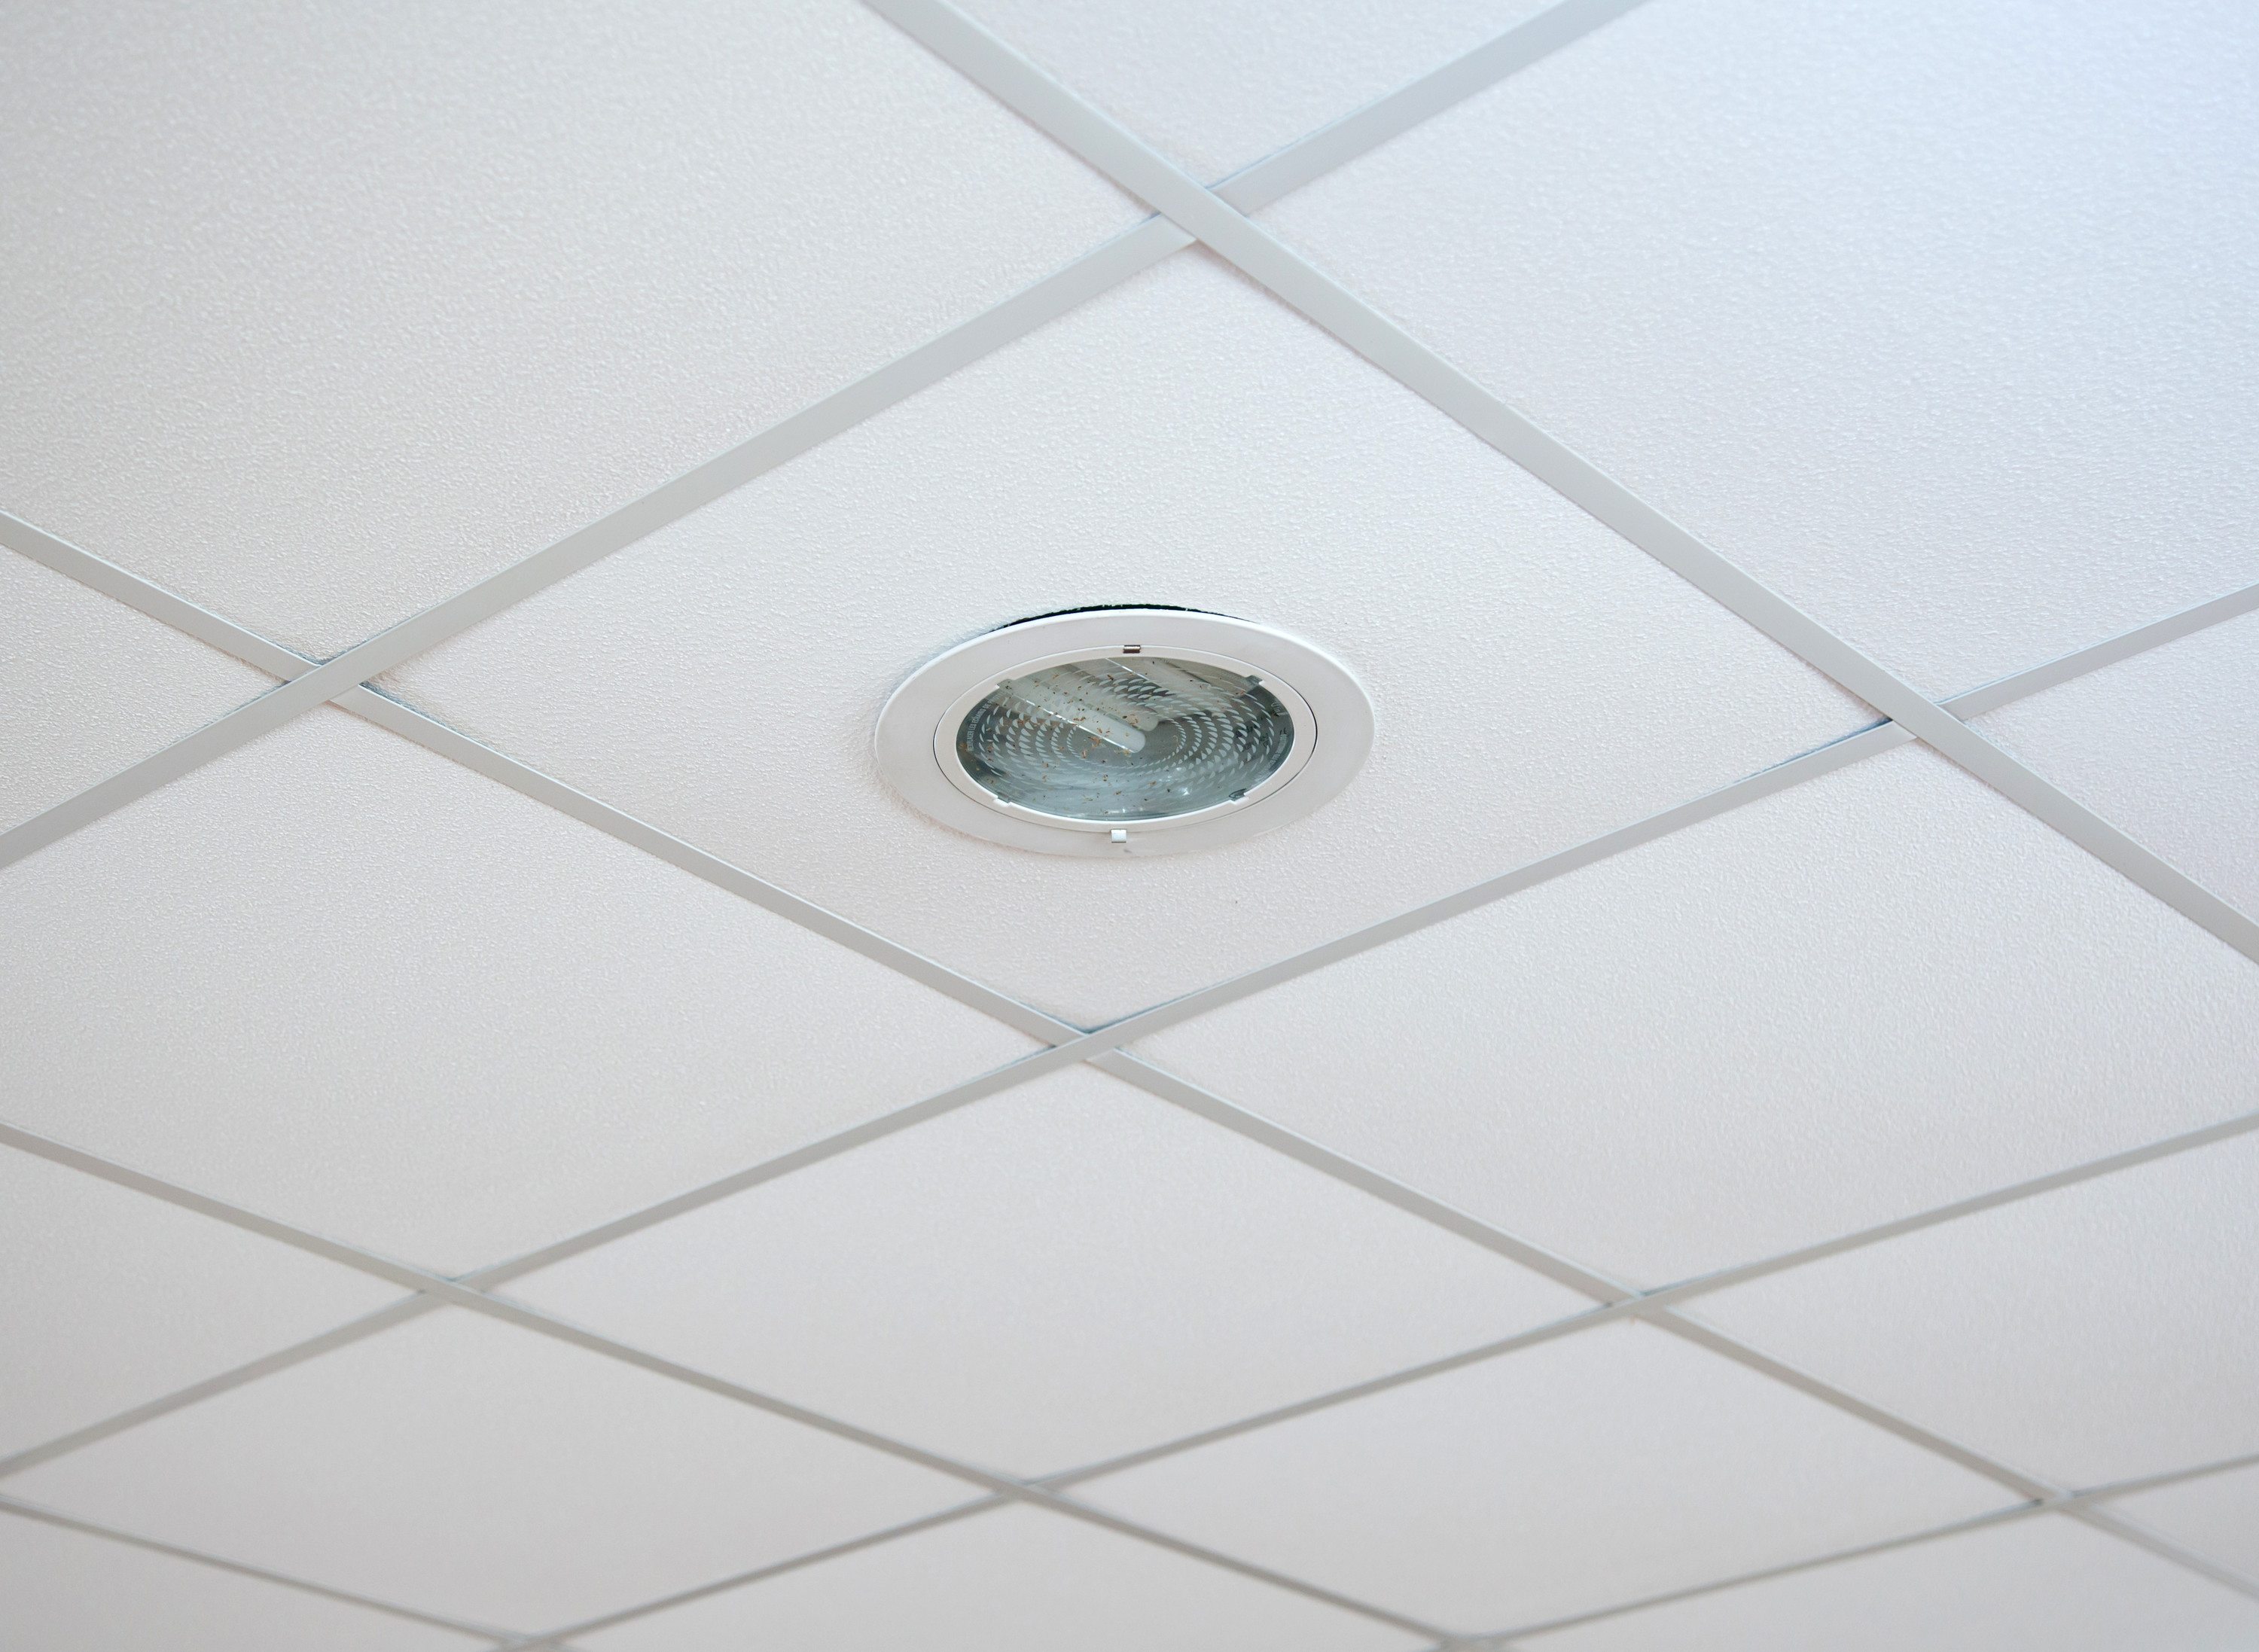
Before I move on from ceilings, you should think about light fixtures. Since basement ceiling height is usually at a premium, recessed fixtures are often the best way to go because they don’t steal head room. They sit pretty much flush with the ceiling surface and they look great. When it comes to choosing recessed fixtures, there are recent developments you need to know about. For many years most recessed fixtures were complicated affairs involving a built-in transformer to step down the power from 120 volts to 12 volts, plus a surprisingly high price tag. It used to be easy to spend $50 to $100 on a single recessed light fixture. And if that wasn’t bad enough, the internal transformer was an item that could fail and was difficult to change after installation. All this improved with simple, 120 volt recessed fixtures. They have their own built in electrical box and they don’t even need to be mounted on the ceiling frame before drywall goes on. Just cut holes of the right size in your ceiling drywall as it goes up, wire the fixture to the wires installed near the hole, then pop the fixture into the hole after painting. This type of recessed fixture grips the edge of the drywall hole with spring pressure and that’s the only thing that holds it in place. It’s simple, reliable, beautiful and economical.
+++++++++++++++++++
TECH TIP: Simplest Basement Ceiling of All
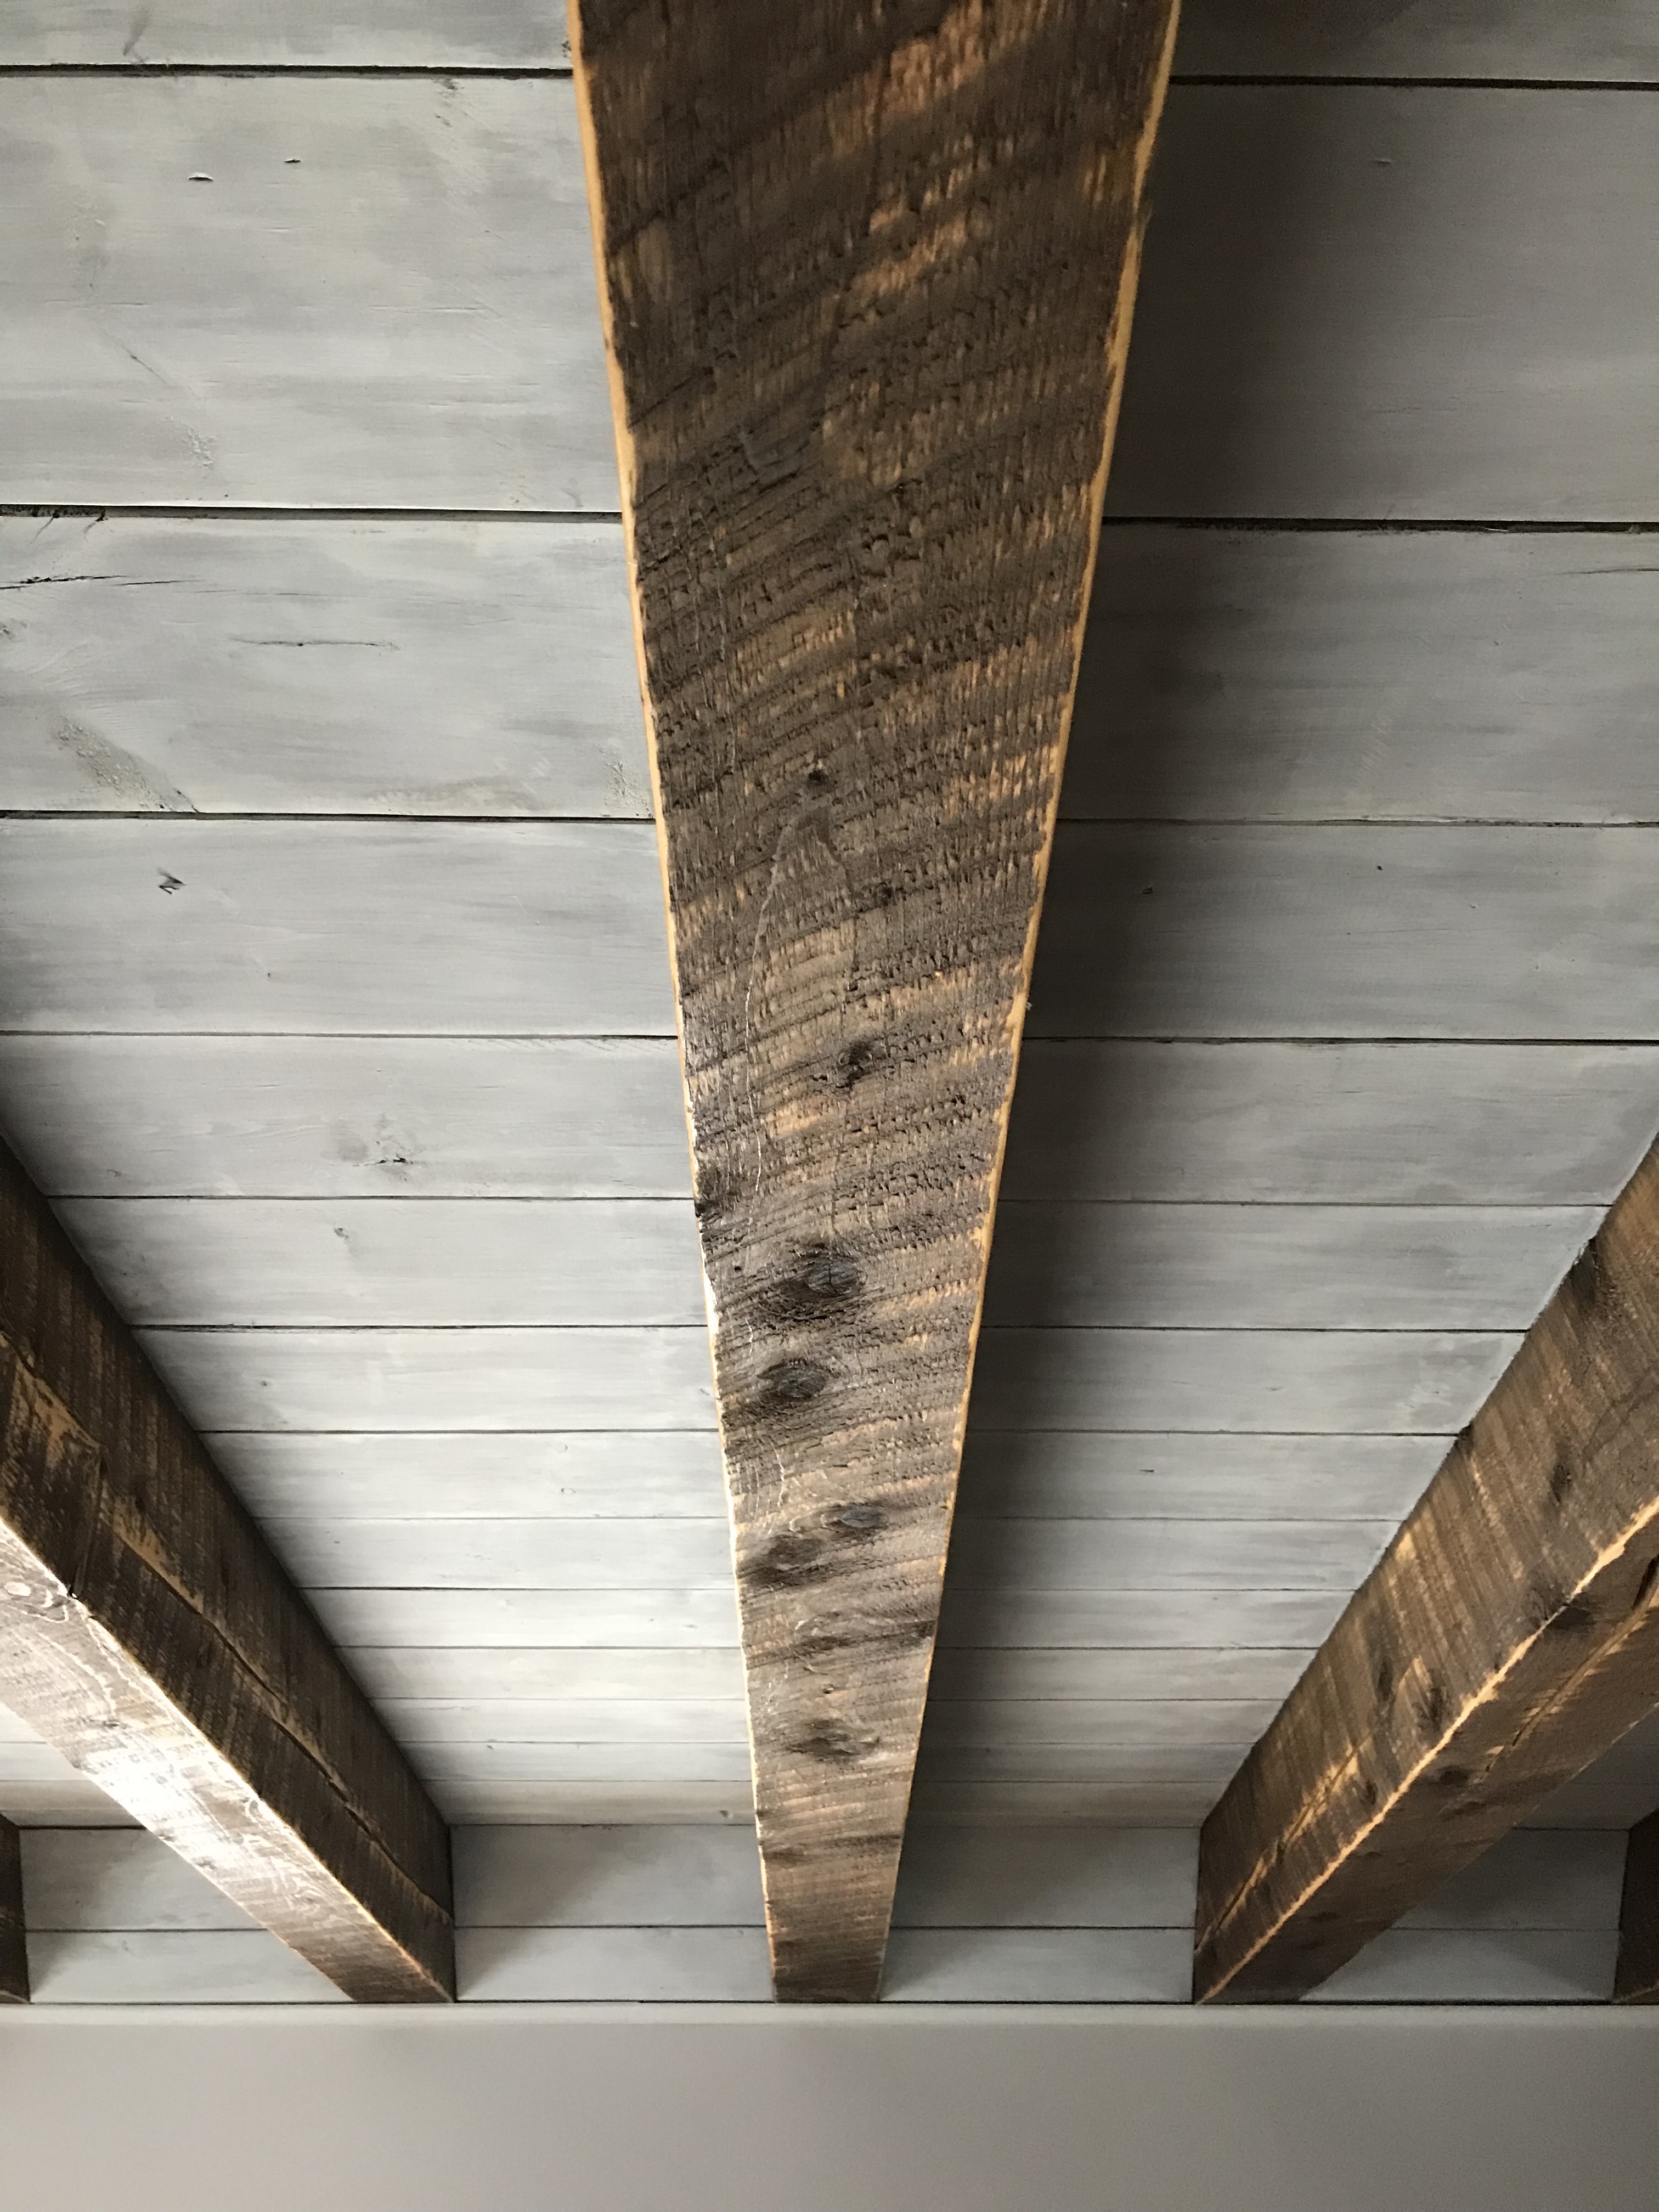 Although it’s not the option for every finished basement in the world, you might consider the open joist ceiling option if you like an informal look and you’re on a tight budget. Depending on the wood used for framing the floor above your basement ceiling, it could look quite good if the joists and the underside of the subfloor are left opened to view and finished. Clean things up, paint the area, and you’ll be surprised how attractive structural floor joists can look in a rustic, retro kind of way.
Making this option work becomes more challenging with pipes and wires present, but plenty of basement ceiling areas are usually free of these things. The example of open joists shown here had white pickling stain applied to the underside of the solid wood subfloor between the joists. The joists are actually small beams in this case. They were stained first, then lightly sanded to accentuate the curved sawmill marks before sealing everything under two coats of satin polyurethane.
+++++++++++++++++
Best Recessed Light Fixtures for Basements
Perhaps the most important technical issue you need to understand when it comes to recessed light fixtures has to do with the nature of the space above the recessed lights. In the case of your basement ceiling, this will be a fully interior, heated/air conditioned space, and it might also have batts of sound insulation present. In the world of recessed light fixtures, there are two main types: IC-rated and non-IC rated. These letters stand for the words “insulation contact”. IC fixtures are considered safe even when completely shrouded in insulation that touches the fixture. Non-IC fixtures are not supposed to touch insulation because they could get too hot. The thing is, the advent of cool running LED light bulbs means that heat isn’t the issue it used to be.
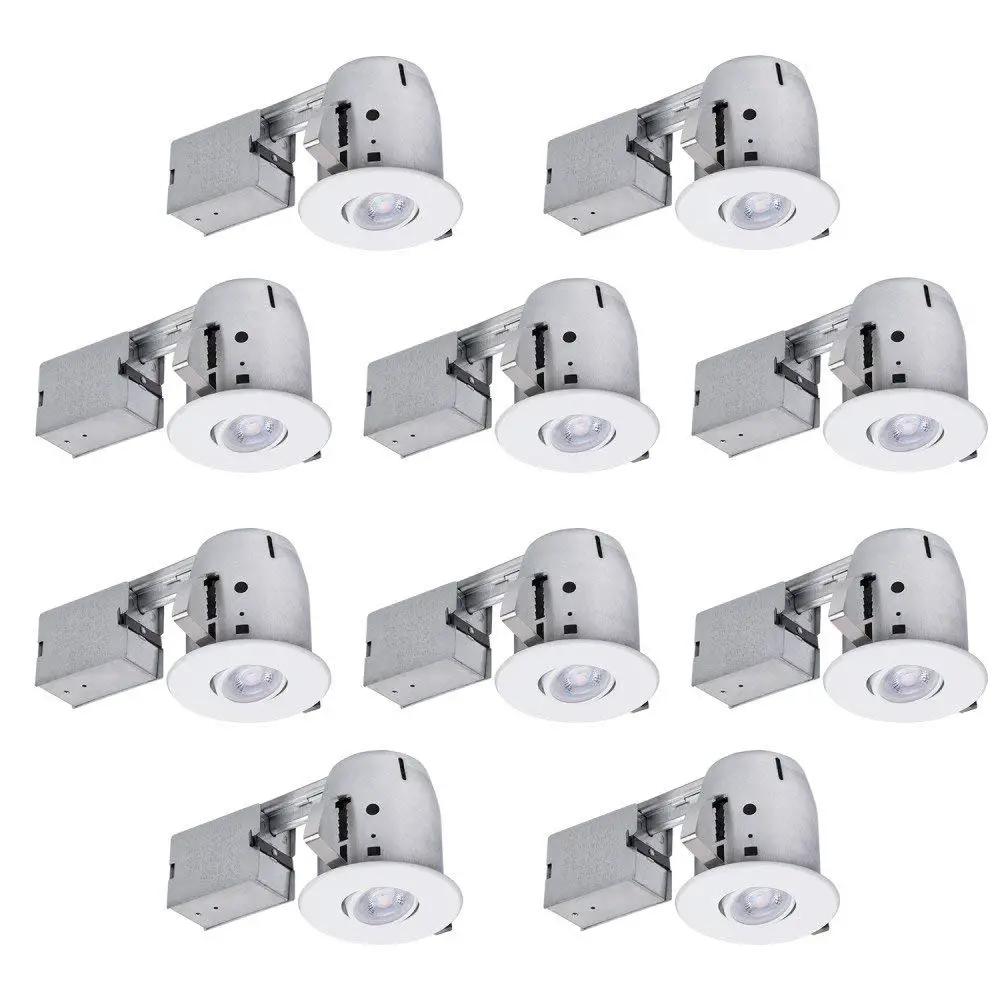
My favourite recessed fixtures right now are considered IC when fitted with LED bulbs. They’re also very inexpensive (less than $10 each fixture) while still looking great and being easy to install. Here’s a link for the ones I’ve bought and installed in the past. Just so you know, the whole IC designation thing comes into play again when fixtures are installed in spaces that are not heated. This isn’t a basement situation, but it happens most commonly when recessed fixtures are installed in ceilings with an unheated attic above. In cases like these you absolutely must use a fixture that bears the ‘IC’ designation. Besides being rated for safe insulation contact, IC fixtures are also designed to prevent warm, moist indoor air from leaking up through the fixture and condensing in the surrounded unheated space during winter. IC fixtures are sealed, and if it weren’t for this key feature, frost and water would develop above them during cold weather, damaging the fixture and your home. Information on light fixture placement and density for basements is coming up in a future lesson.
+++++++++++++++
TECH TIP: Suspended Ceilings
Even though you’ll often see suspended ceilings installed in finished basements, I recommend against them. Besides making your basement look like an office (who wants that?) lack of sound resistance is the main reason. Suspended ceilings have those removable tiles that sit in a metal framework supported by wires fastened to the joists above. The attraction of suspended ceilings is two-fold.
First, they’re relatively easy to install – easier than drywall because the joints don’t need taping and sanding. Suspended ceiling tiles also come ready to install. There’s no need for painting.
The second reason people like suspended ceilings in basements is because it allows easy future access to pipes, wires and ducts within the joist framework. Neither of these virtues makes up for the fact that you really can’t apply effective sound resistance strategies to a suspended ceiling. No resilient channel, no additional drywall between the joists and no tight sealing of the surfaces are possible. Sure, you can stuff fibreglass or rock wool batts between the joists before the suspended system goes up, but stray sound will still leak upstairs and down through all the joints between ceiling tiles and the suspending metal framework. Besides, suspended ceilings always steal an inch or two of extra height because of the suspension wires and frames that hang down. Go with a suspended ceiling if you want, but consider yourself warned. They’re not my favourite for basements.
++++++++++++++++++
PEX Water Supply Lines in Ceiling
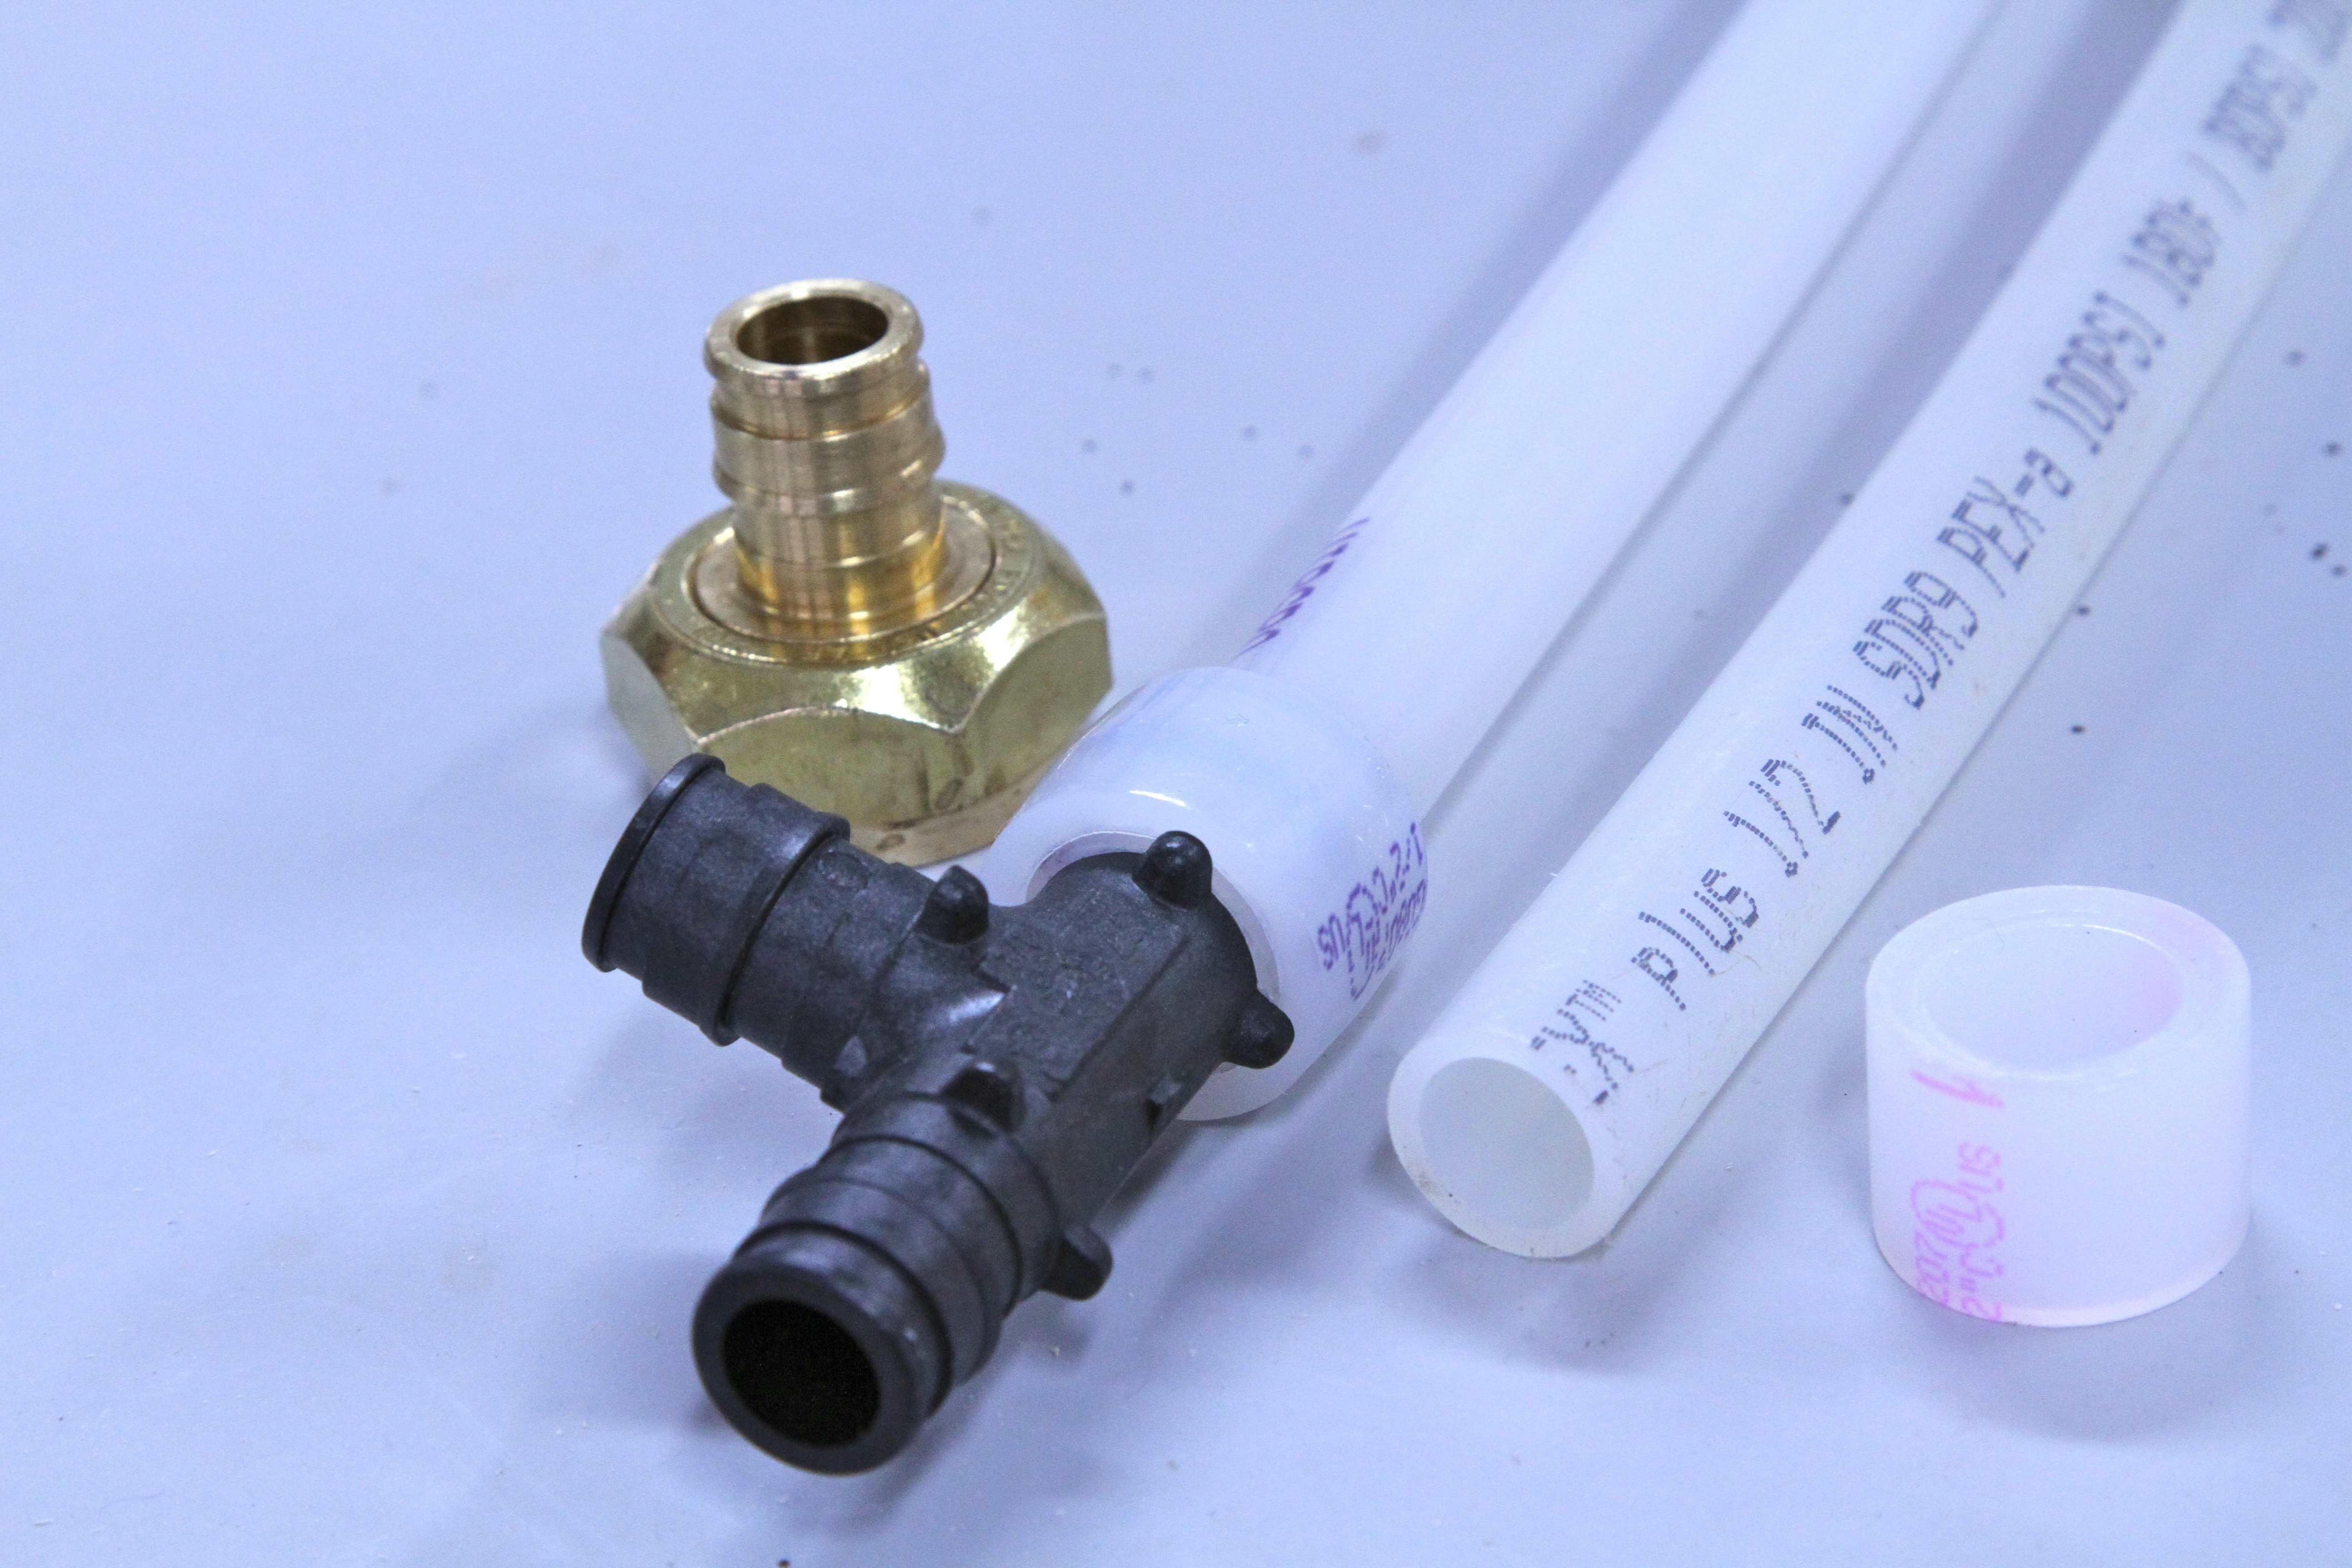
Most basements need some kind of hot and cold water supply, and ceilings are often the best places to run the necessary pipes in basements. PEX pipe makes it easier to run these lines than copper or other kinds of rigid pipe because PEX is flexible. The letters P-E-X stand for cross-linked polyethylene, and it’s the best option for basements. The flexibility of PEX pipe means you need far fewer elbows and less pipe. By bringing hot and cold water supplies to a central manifold, branch lines can be installed to go where needed. Most homeowners have a plumber install water supply pipes, but it’s really not all that difficult to do yourself. Different systems exist for making PEX pipe connections, and my favourite is called ProPEX. It doesn’t use crimp rings like most PEX systems, but rather a resilient band you put on the ends of pipes where you want connections to happen.
Watch the video up next to learn more about ProPEX plumbing connections. I made this video for a generic audience interested in water supply connections no matter where they are. You can get the tool you need to make these connections for less than $300 (one day’s pay to a plumber). This isn’t the only option for connecting PEX pipe, but it is my favourite by far.
VIDEO: Easy Water Supply Pipe Connections
TECH TIP: Cool Corrugated Ceilings
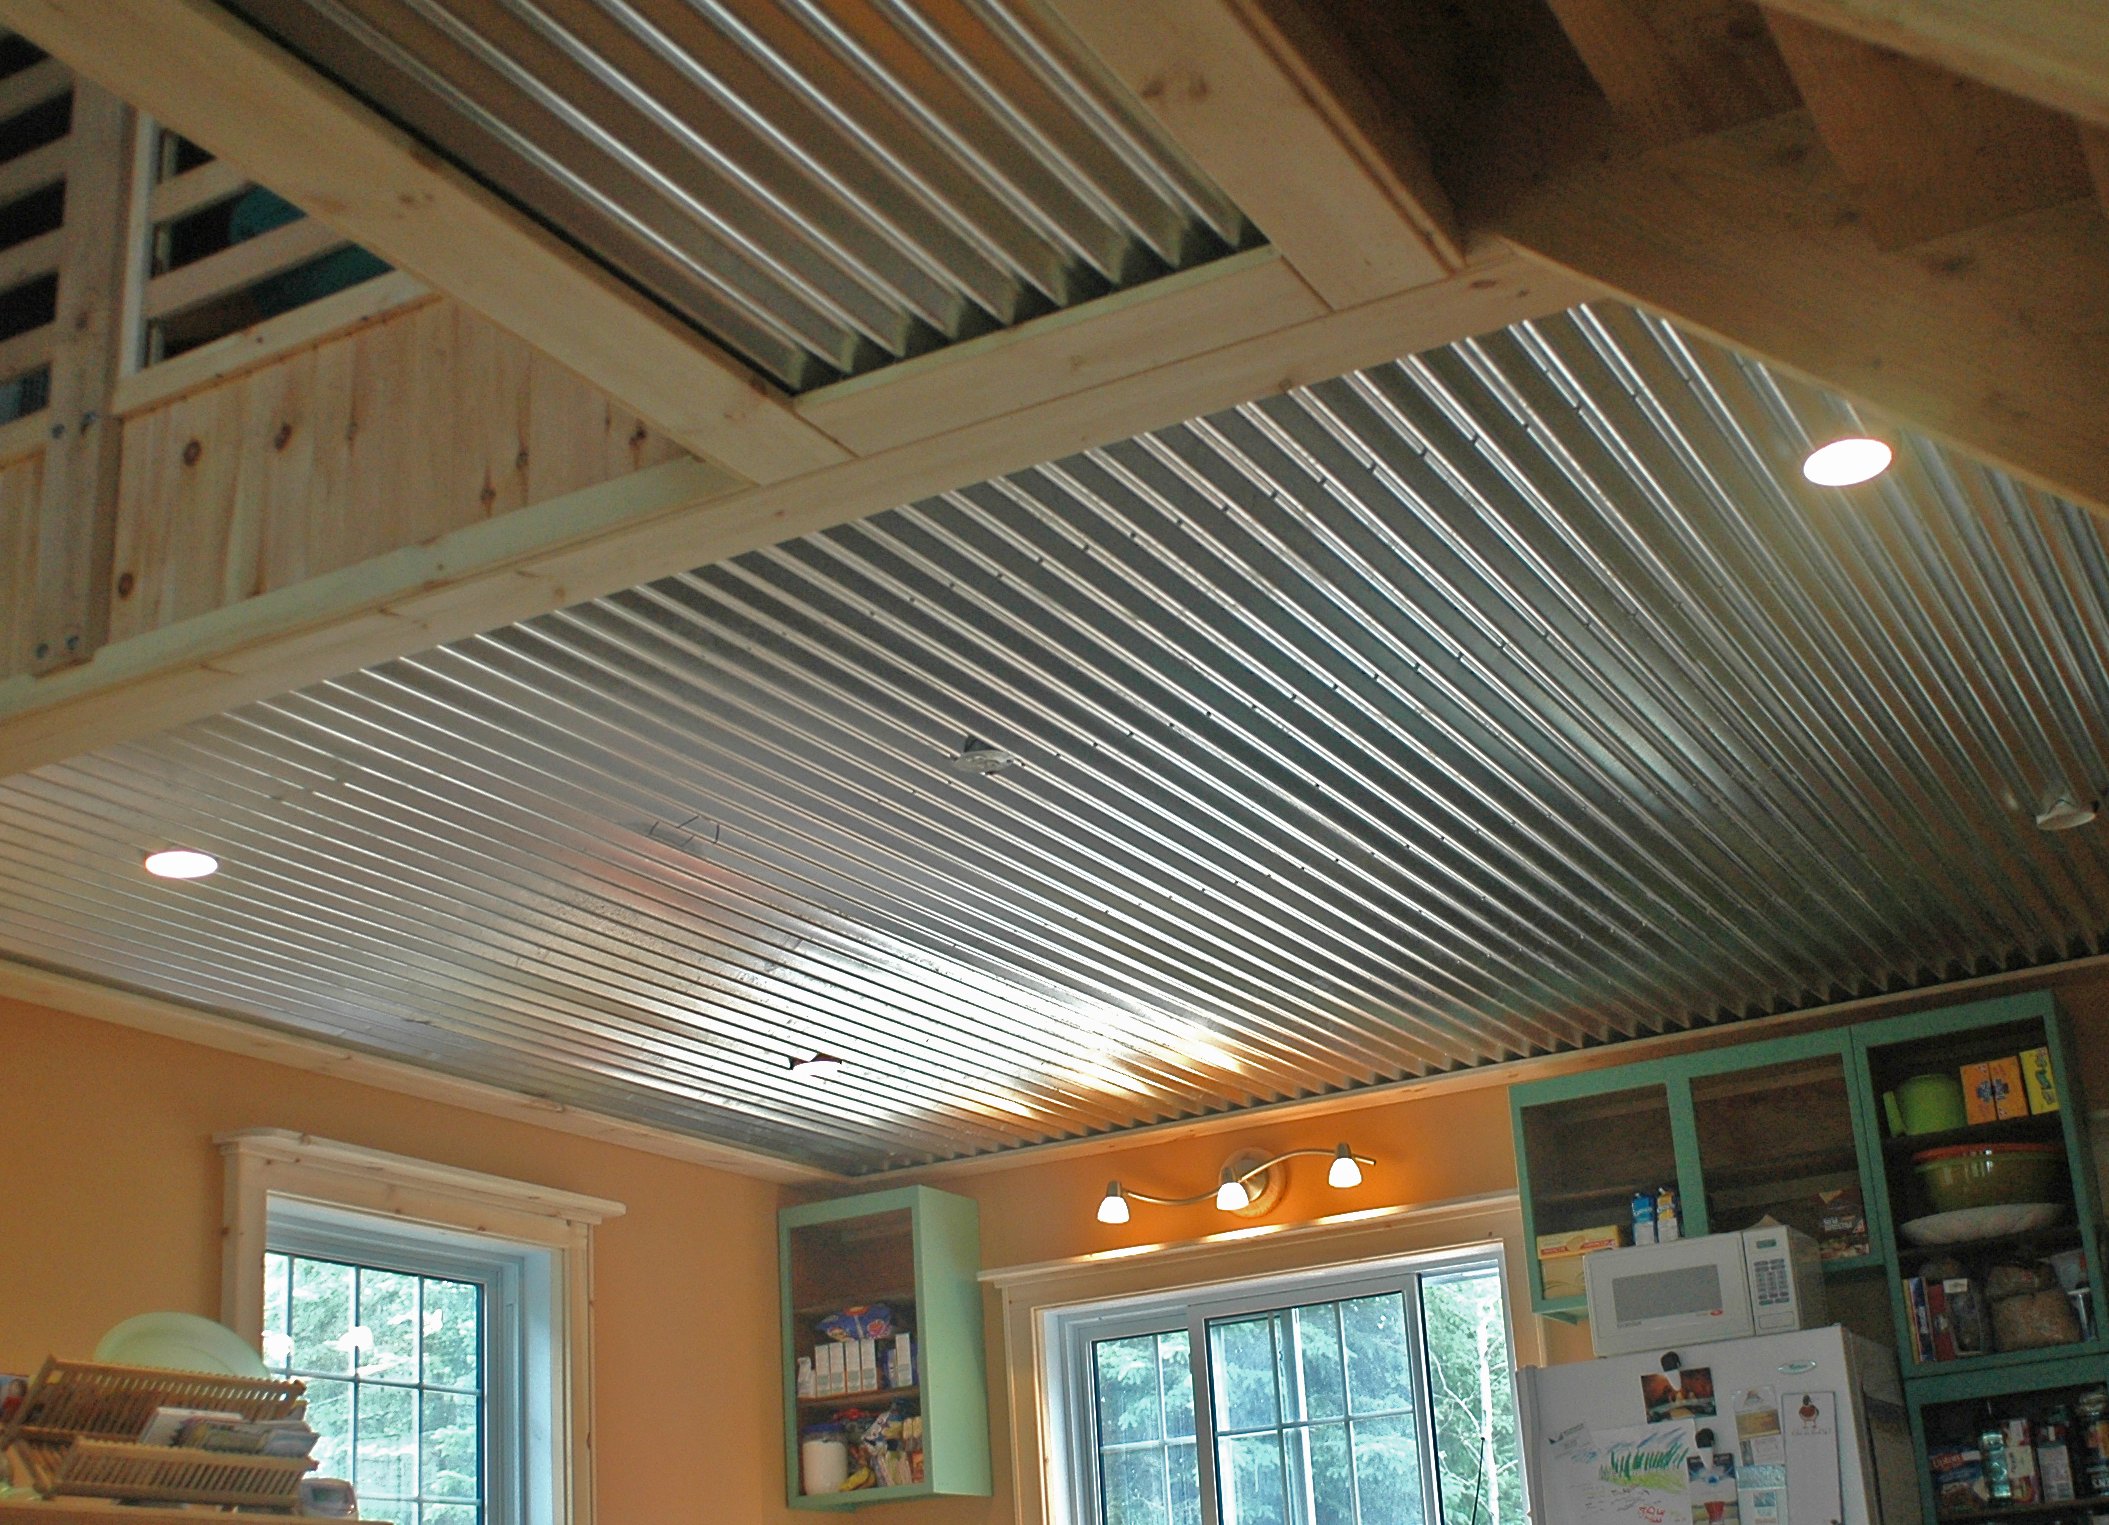
If you’re interested in adding visual variety to some areas of your basement ceiling, consider unpainted corrugated metal roofing. It’s easy to work with, never needs painting and has a timeless industrial look. Metal like this comes in whatever length you need. Simply tell your retailer what you want, and your order will arrive accordingly. Building supply outlets everywhere carry a range of corrugated metal roofing.
Roofing like this can be cut to length on site with a carbide blade in a circular saw if needed. Holes for recessed light can be cut with a jigsaw fitted with a fine metal cutting blade. Bore a hole within the circle where you want the light fixture to be, then follow the outline of the hole with your clothes iron.
