Anatomy of a Basement
This section’s lessons deliver a lot of information, but don’t worry. You’ll have unlimited access to everything here and in the entire course. The main thing to understand right now is that there’s more than meets the eye when it comes to basements. Significant things are happening behind the scenes and you’ll do a better job finishing your basement if you know about them ahead of time.
There are also differences from basement to basement depending on when they were built and where. All this is why you should start by familiarizing yourself with the illustration and video coming up next. The first one includes the features and details found in a typical, unfinished basement built to modern standards. As the lesson progresses, I’ll show you how to identify the kind of basement you’ve got.
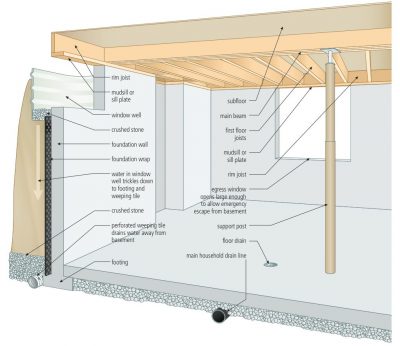
Exterior basement walls act as the foundation of your house. Walls like these have been made in different ways at different times in history. Just to make things clear in the course, I call these foundation walls “perimeter” walls since they’re really not exterior in the same sense as above-ground walls. Depending on when your house was built, there can be very different perimeter basement wall construction methods used. Stone, brick, poured concrete, concrete blocks and even all-wood foundations are possible.
Watch the video up next for a tour of the typical basement construction features. It’s good to know what’s going on behind the scenes before you start planning and working.
VIDEO: Basement Anatomy Tour
Up next are the typical types of basement walls you might have down below at your place. Having trouble determining what type of foundation walls you’ve got? Send me photos at [email protected] and we’ll figure it out together. As I’ve explained, the main thing is that your basement be dry, but it also helps to know which method was used to build the basement walls. Why does this matter? The type of basement construction you have affects how you should go about controlling moisture, and what you might need to do to make the foundation walls sound and finishable. Most basements built between the 1940s and today have some kind of concrete block or poured concrete foundation.
Poured Concrete Basement
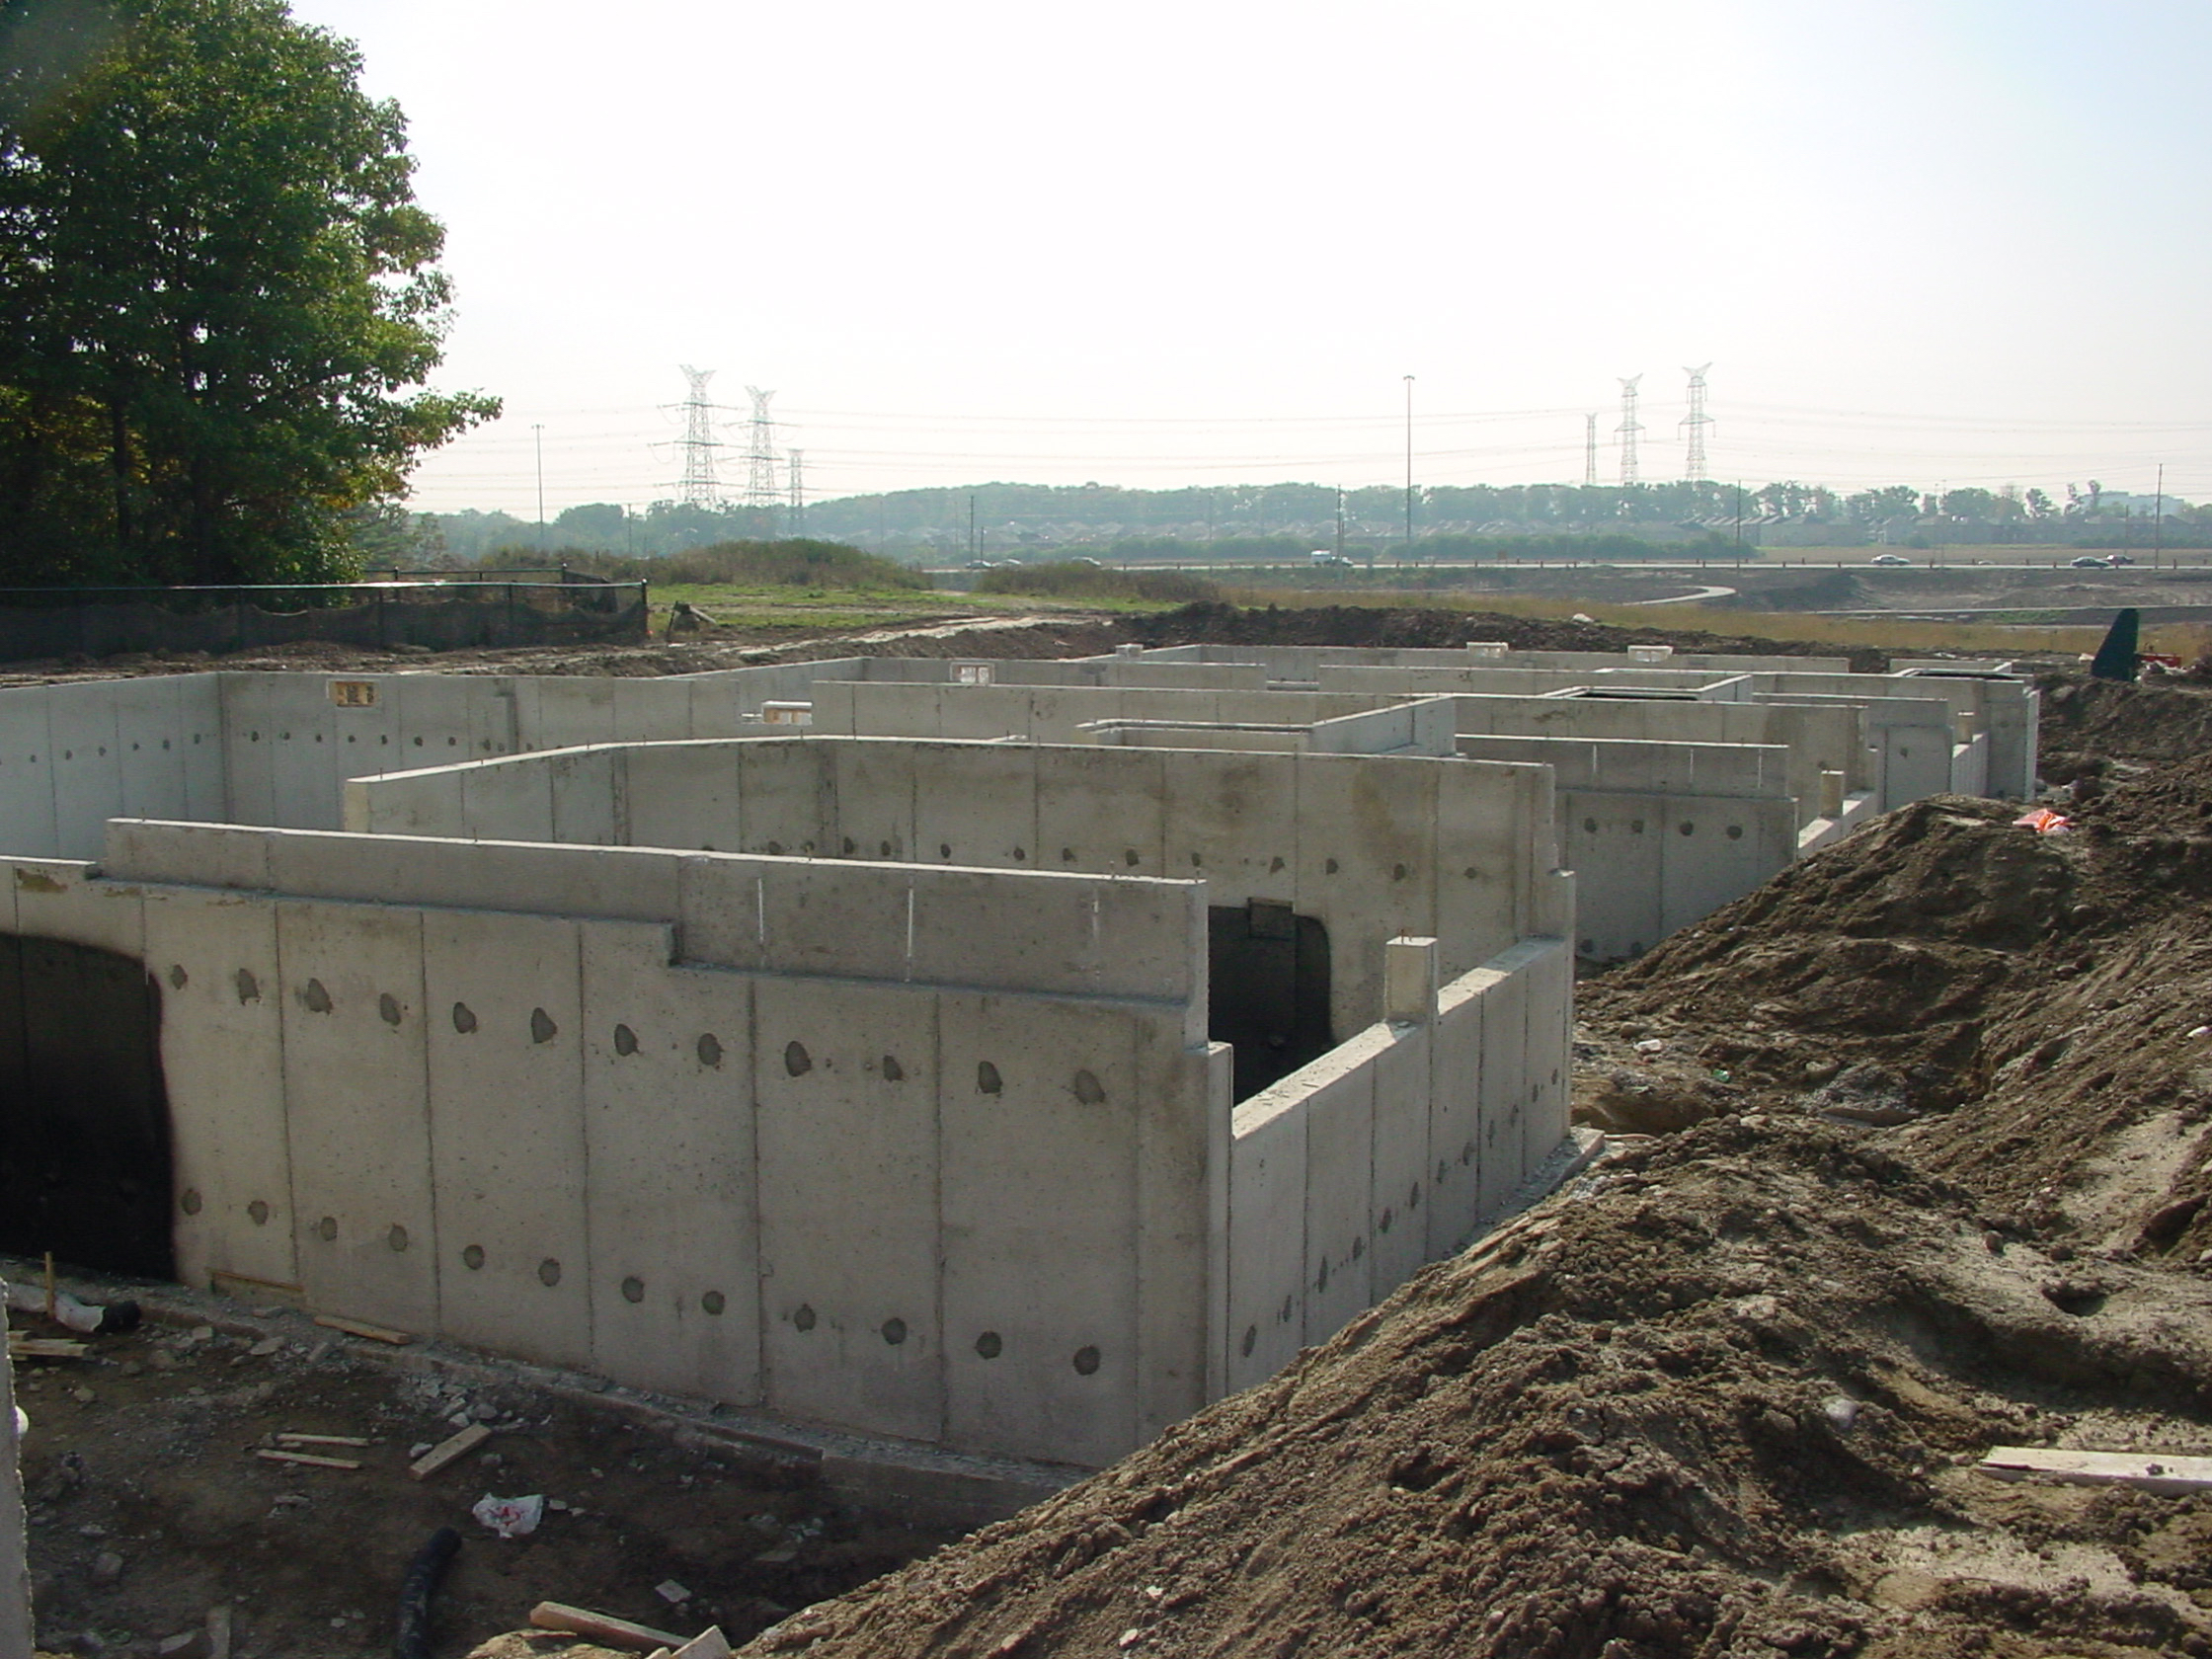
This is one of a few modern approaches for basement construction, and it’s also one of the best for finishing. You know you have a standard, poured concrete basement by the relatively smooth, joint-free expanse of concrete you see on the inside face of the foundation walls. There may be imprints of wood grain in the concrete if plywood or lumber were used for the forms. Poured concrete basements are strong, but look out for cracks and holes worth sealing as you inspect any poured concrete basement.
Do you see those rows of round dark spots on the concrete in the photos here? That’s where ties were located to support the inner and outer forms that held the concrete while it cured. Water is most likely to leak in around the place where the ties existed. Patch and waterproof these areas from the inside before finishing a basement with a poured concrete walls. Hydraulic cement is the best material for filling the holes left behind by form ties, followed by a coat of waterproof paint on the entire inside face of the foundation walls.
Insulated Concrete Form (ICF) Basement
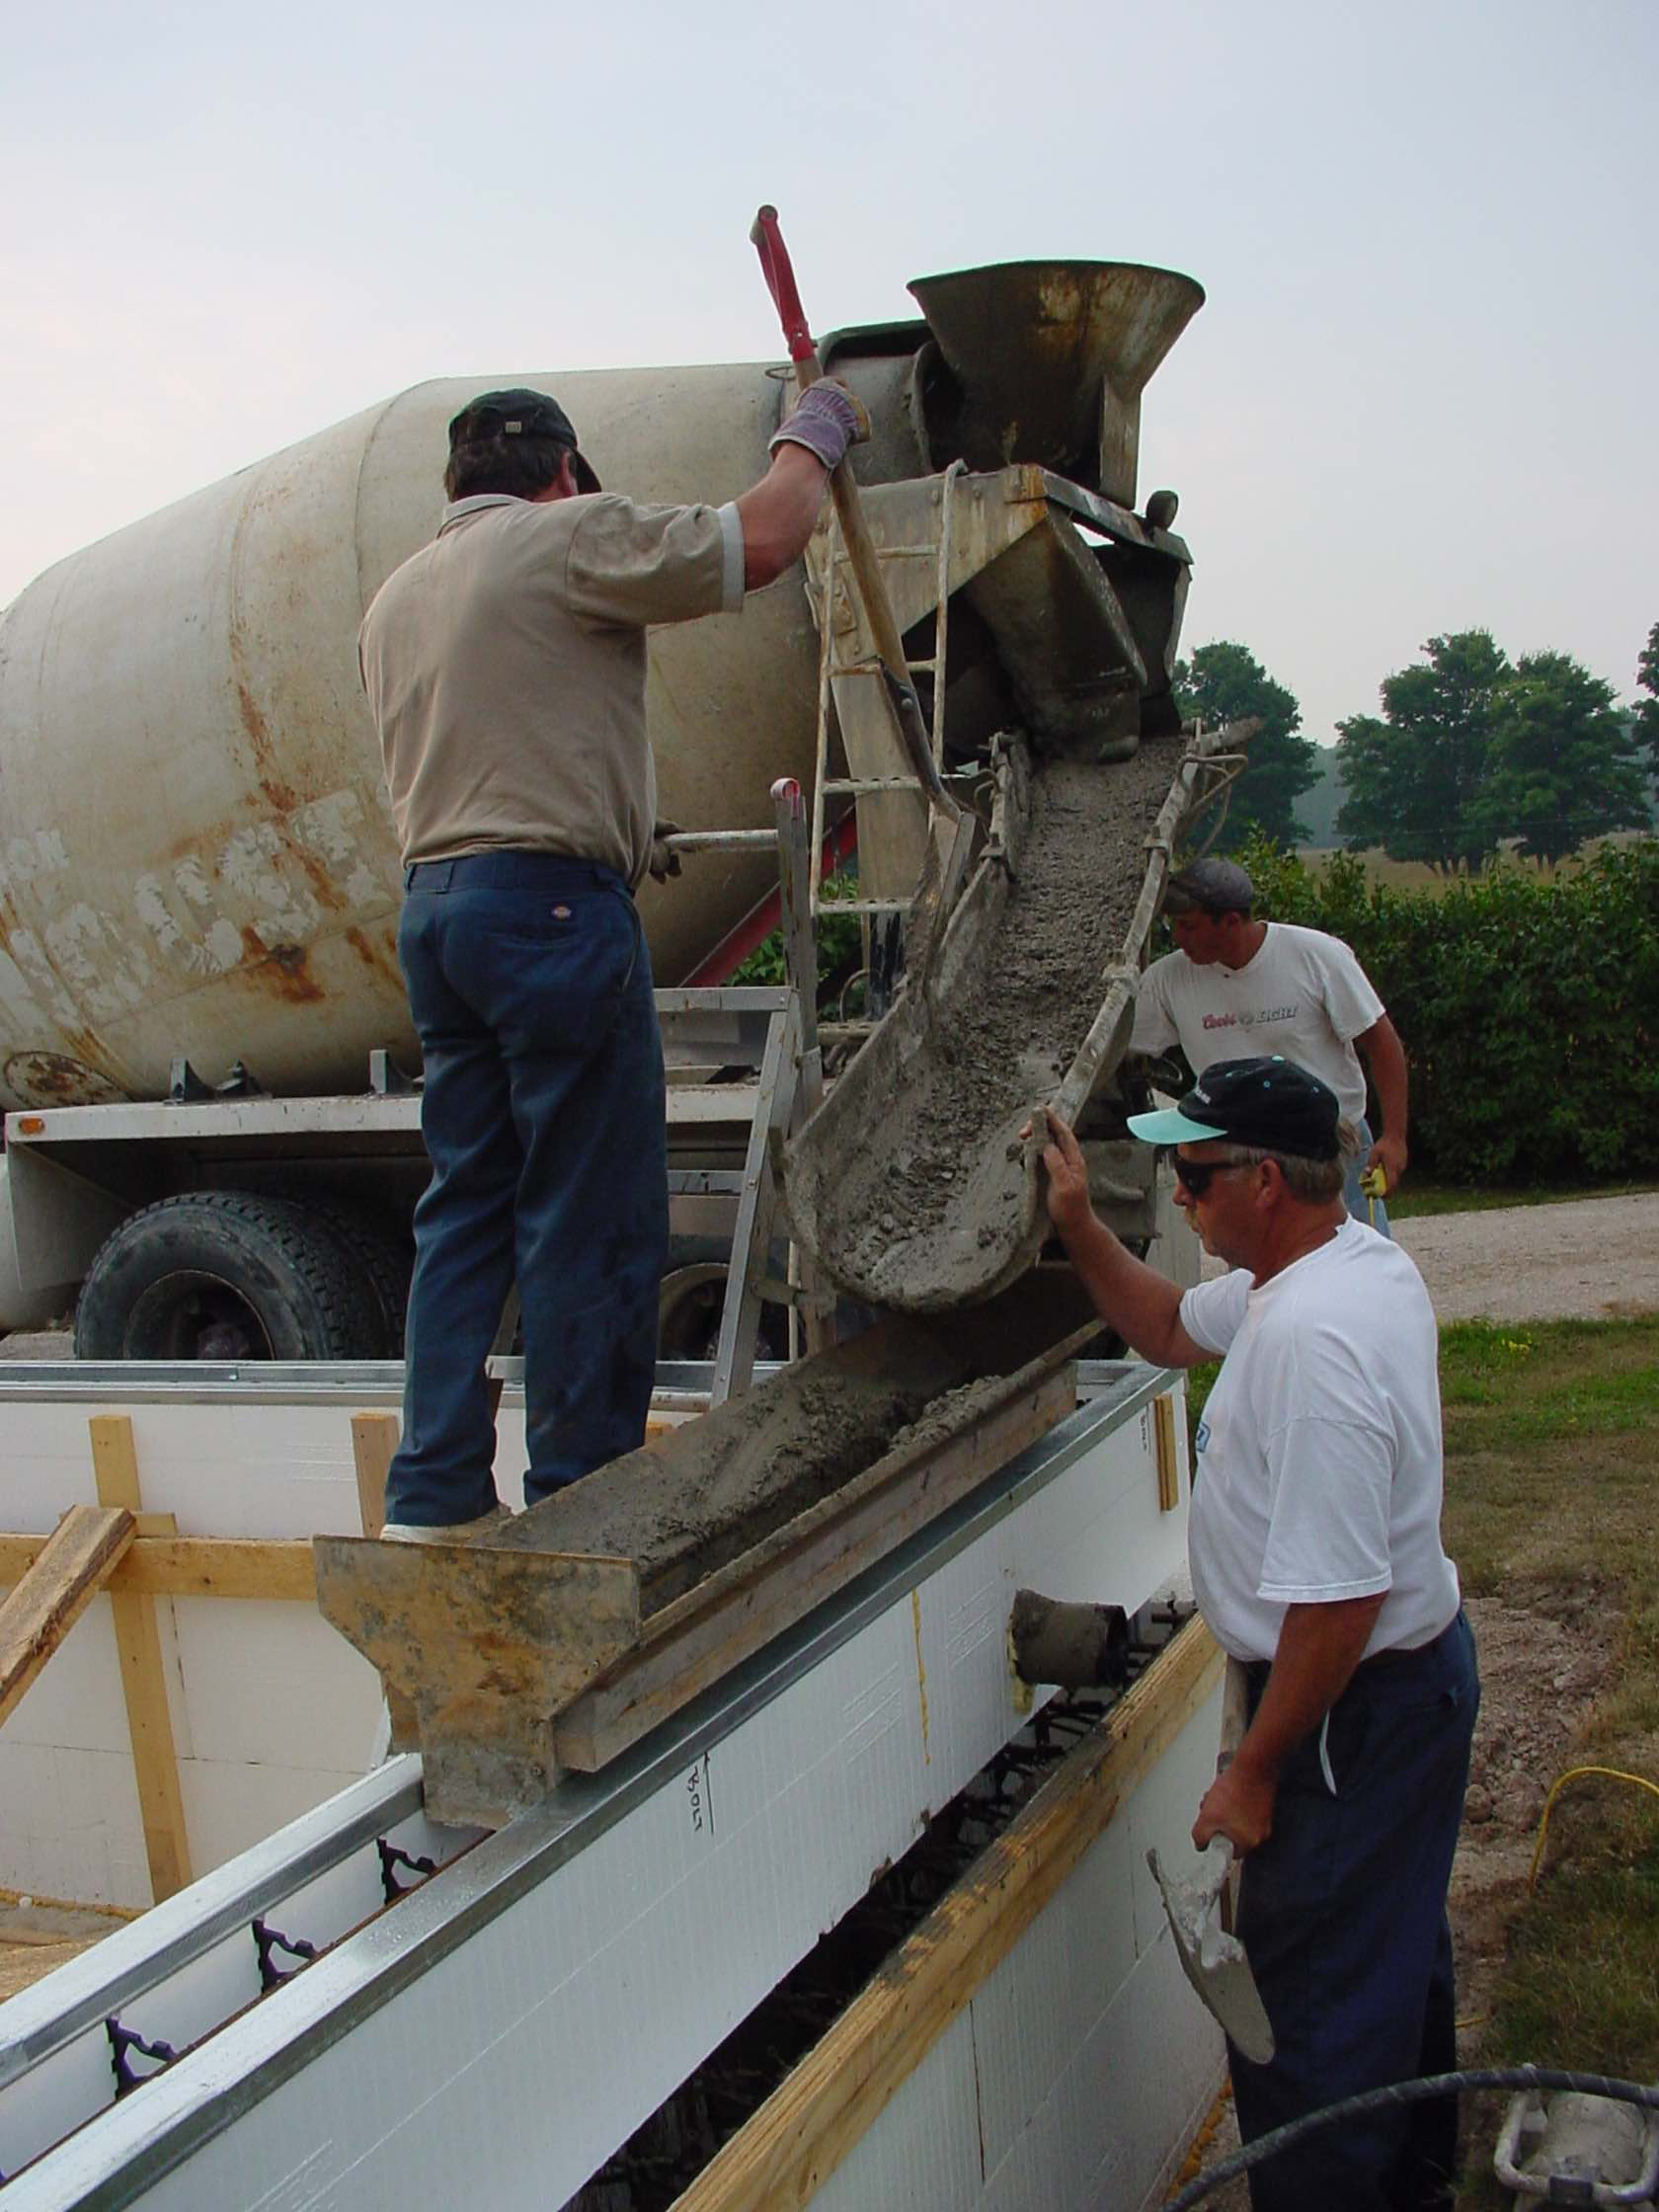
This is a particular type of poured concrete foundation. Instead of wood or metal forms to contain the concrete while it’s wet, an ICF basement uses rigid foam forms that never come off. Concrete is poured between the foam and hardens there. The foam stays in place on the outside and the inside of the basement to act as insulation. Plastic anchor plates are molded into the foam to provide a place for screws to grab and hold interior wallboard such as drywall.
Some early examples of ICF systems from the 1990s were flawed because they allowed indoor air to sneak behind the foam, permitting water to condense out of this air during cold weather. This is rare, but if the joints between ICF panels in your basement are not tight and naturally sealed, apply 6 mil vapour barrier plastic on the inside before wallboard goes on. All in all, a typical ICF foundation is a great option for turning into a finished space. You’ve already got all the insulation you need. Count yourself lucky if you’re working with an ICF basement, though only if it has a track record of reliably dry performance. One drawback of ICF is that you can’t apply waterproof paint to the inside face of the walls as long as the foam forms are in place there.
Block Wall Basement
This is another type of modern basement made with what’s variously referred to as cinder blocks or concrete blocks. Most block basement walls are 8 inches thick and hollow. Blocks aren’t as strong as they look and are easily damaged by a backhoe or excavator bucket that bumps into them. Warn any machine operator working around your house how fragile a block wall is if you need to call someone in with heavy equipment. That said, a nice, dry block foundation offers a great opportunity for finishing. The bare surface of concrete blocks is particularly porous and well suited to accepting waterproof paint. Most so-called “waterproof” paint is nothing of the sort. Use either Drylok or Xypex. Both have a long track record of keeping water out. One thing to keep in mind . . . It’s more challenging to anchor things to a block wall than a poured concrete one. Both are made of concrete, but blocks are only a little more than an inch thick on the sidewalls. This makes a freestanding finished basement insulation wall system better suited to a block foundation than foam applied directly to the blocks.
Brick Basement
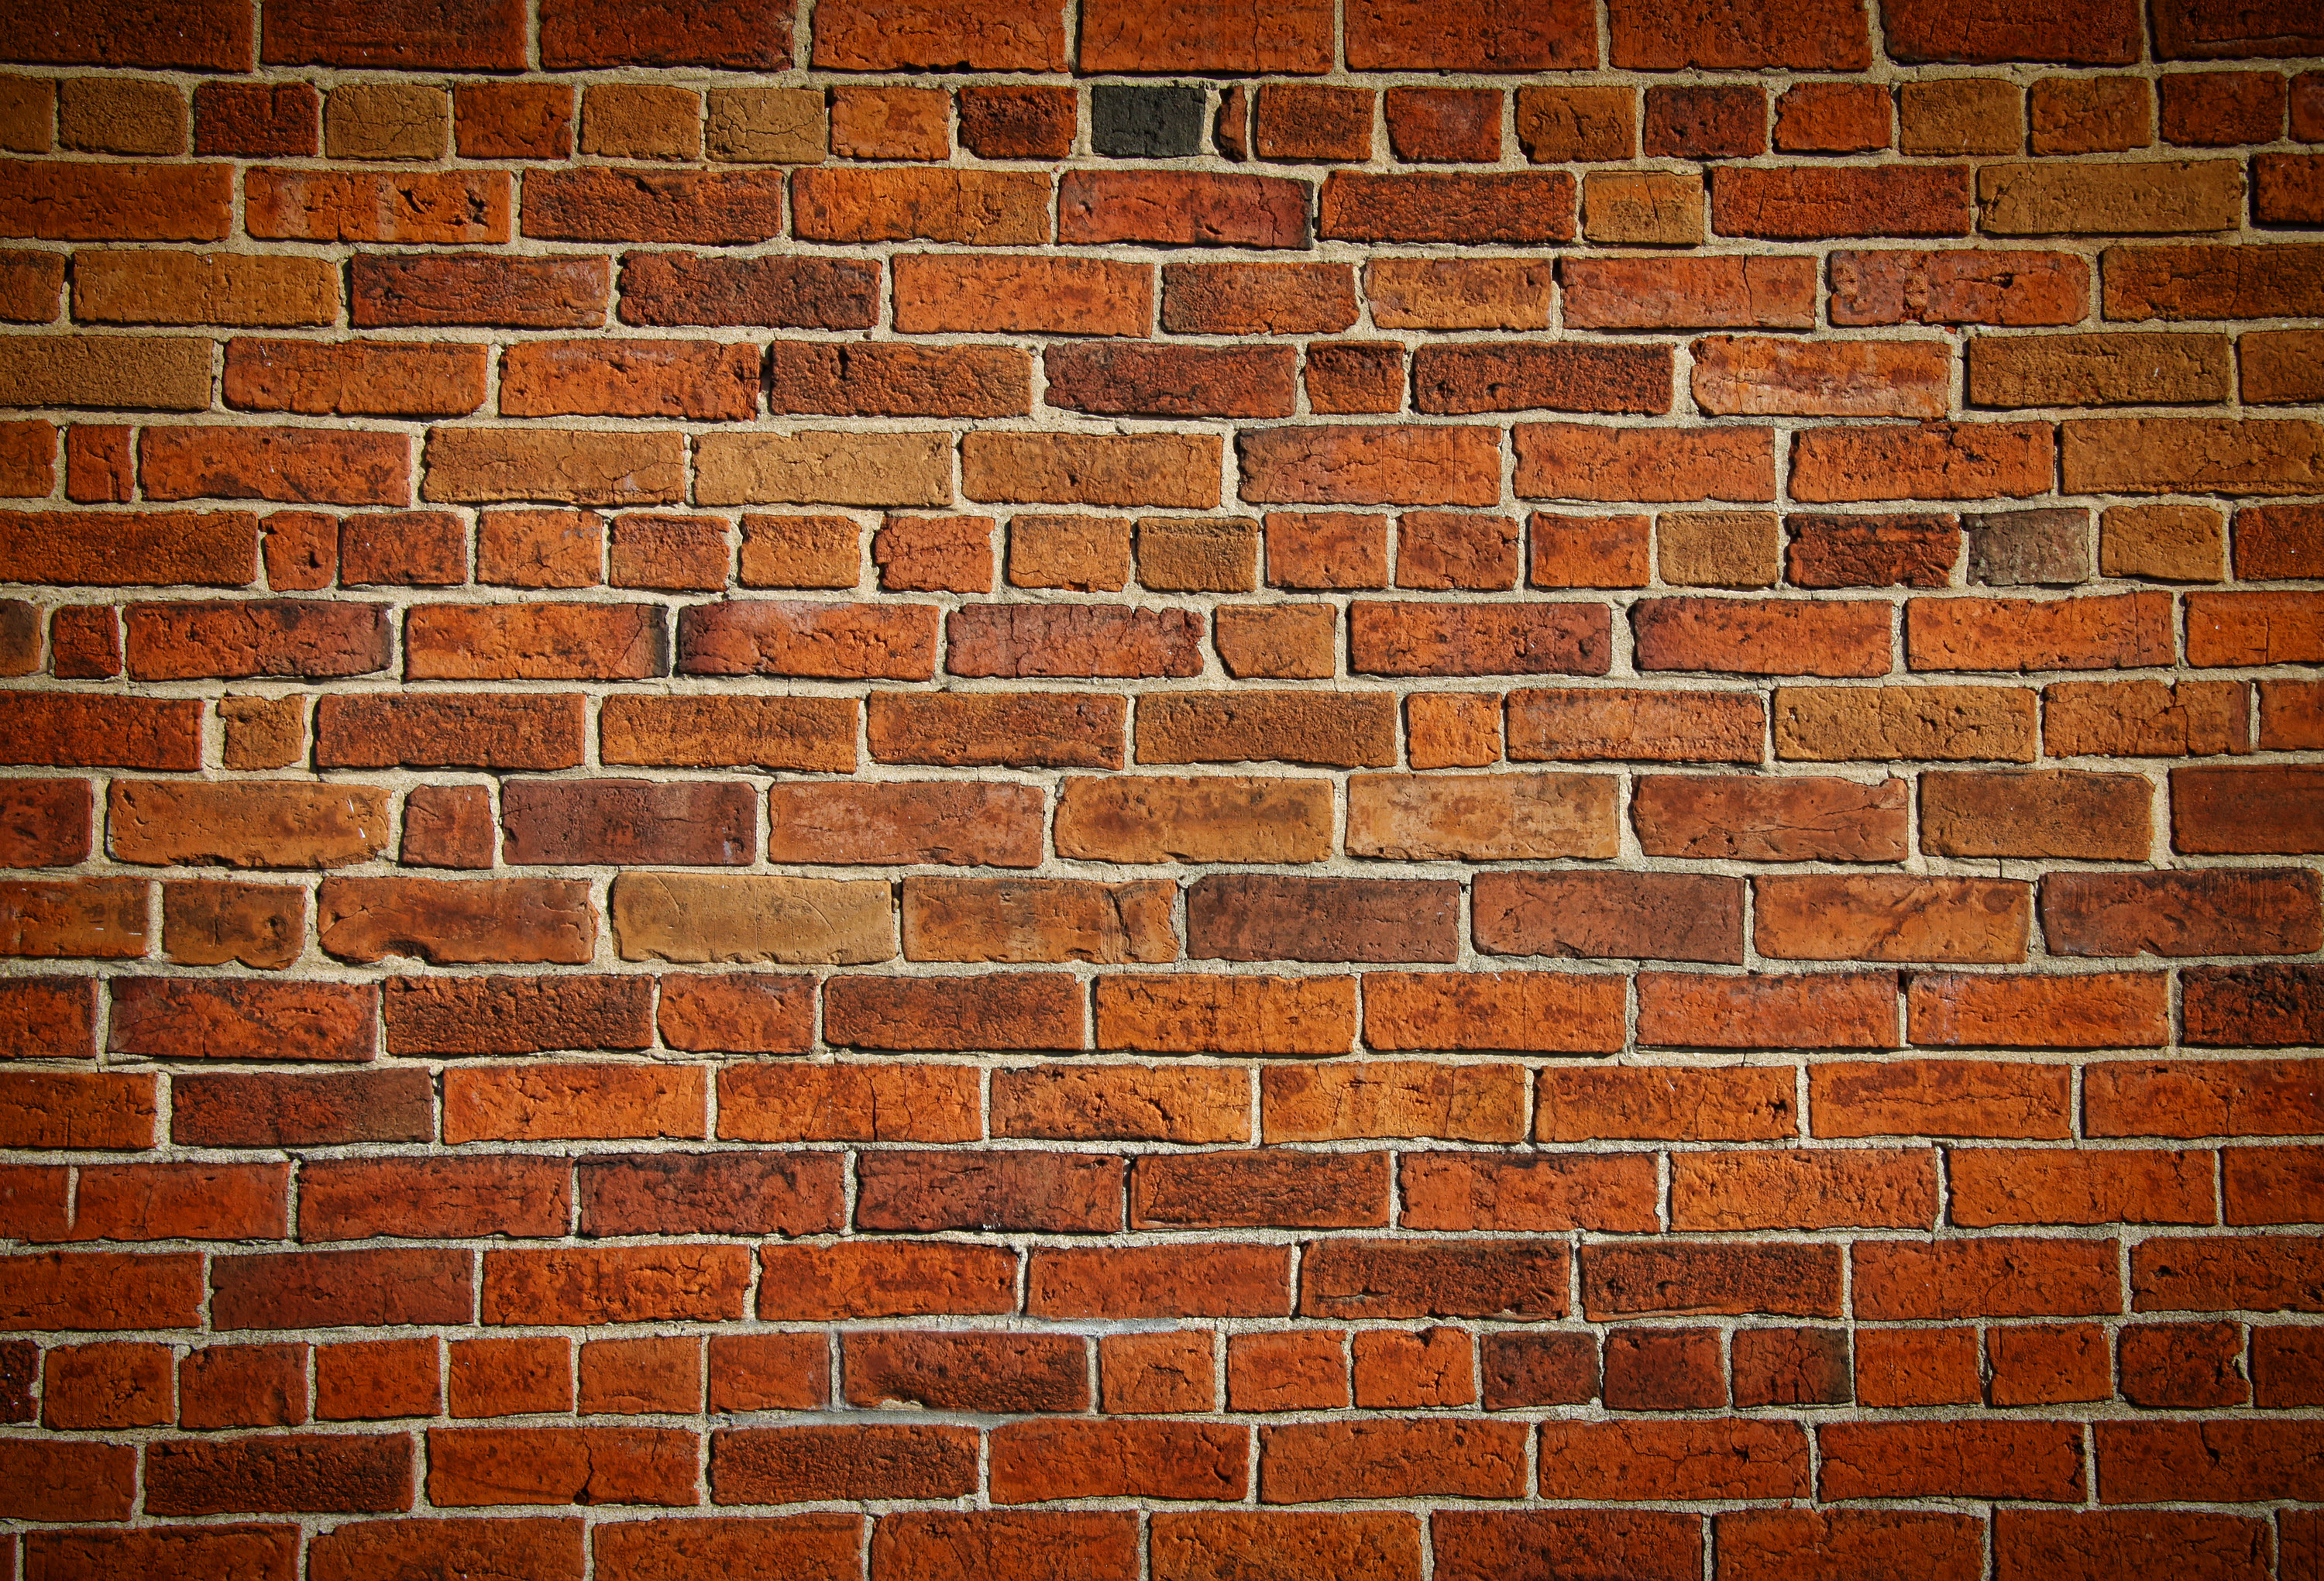
Depending on where you live, brick foundations may have been popular after builders stopped using natural stone for the job. Bricks were generally used before blocks and poured concrete became common, but only after stone was phased out. If you can see bricks from inside your unfinished basement, then the entire wall will probably be made of bricks several layers thick. If you live in a place that doesn’t get too cold, or if your plans are only to create a semi-finished basement (more on this later), leaving the bricks exposed is a viable option. Sandblasting is a messy but effective process for making old, dirty bricks look great, in that retro kind of way.
Stone Basement

This is one of the oldest foundation walls you’ll see, and it may be easy or difficult to finish a stone basement depending on what you find. If the mortar between the stones appears sound and can’t be chipped out easily with a screwdriver, then that’s a good start. If the foundation wall is also plumb (straight up and down) on the inside surface, that’s good, too. Depending on the mason who built the place, the inside face of the walls may have been made to slope outwards intentionally to boost stability.
The main concern with a stone foundation is that it’s waterproof. No surprise there. Back in the day when they built stone foundations, they almost never used weeping tile or foundation coatings. Your stone wall is probably just 18” to 24” of stone and mortar, without any tar or waterproofing on the outside. And while this sounds thick and sturdy, water can easily pass through this much stone work, especially if that basement sits on top of bedrock.
A basement built directly on bedrock is not a common situation in most places because bedrock is usually well below the surface of the earth in most places. That said, I do see homes built on bedrock quite often in the cottage country around my area of Canada. If you’ve got bedrock showing anywhere on your basement floor, what you do about it matters a lot. The issue is condensation and the way bedrock remains so cold during the summer. If you do the bedrock basement thing wrong, you will have problems with condensation and mold growth.
Listen to the audio lesson below to learn more about why a bedrock basements present unique challenges. And if you do have bedrock showing in your basement (regardless of how the walls are constructed), be sure to contact me. We’ll need to look at your specific situation closely together to avoid making mistakes. There’s definitely a special danger involved when you’re dealing with bedrock.
AUDIO: Important Bedrock Basement Tips
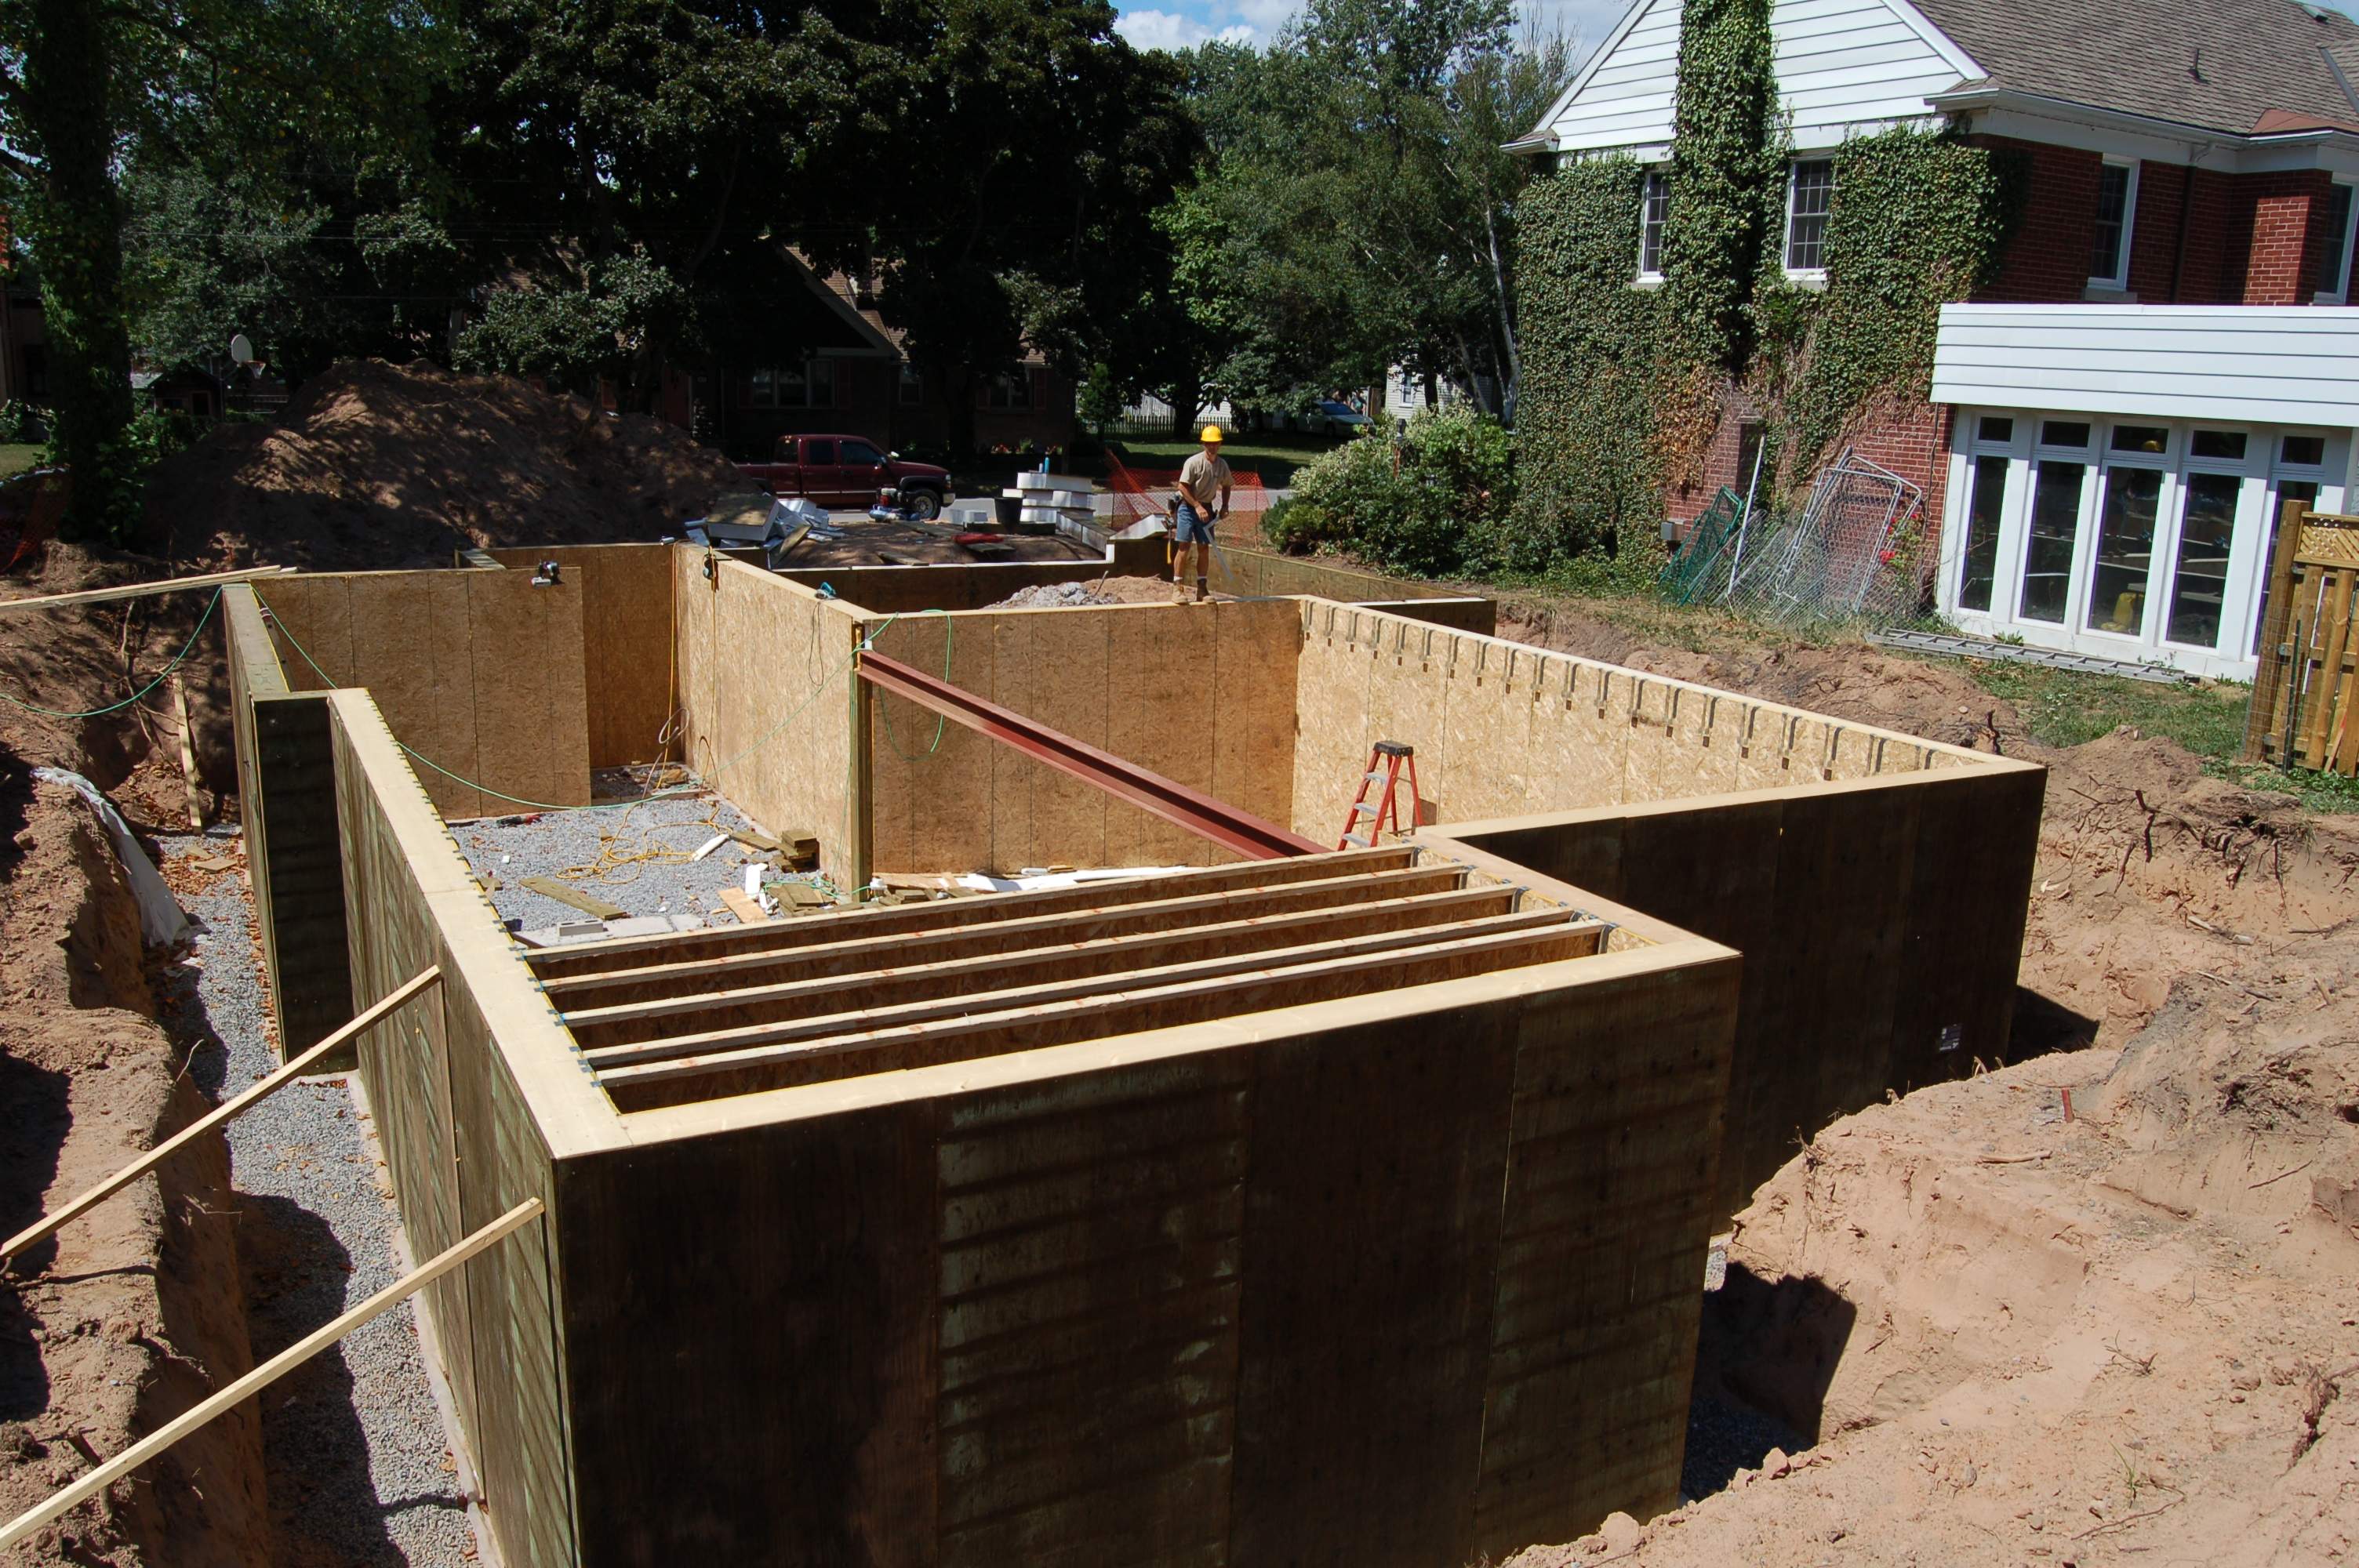
Preserved Wood Foundation (PWF) Basement

Preserved wood is lumber that’s been impregnated with chemicals at a factory to discourage or prevent rotting of wood and insect damage. These days the active ingredient involved is usually copper and it’s quite safe. As strange as it sounds, large areas of the world allow pressure-treated wood foundations and they work fine in areas where they are approved. These are made entirely of lumber and plywood that has been extensively treated to permanently resist rot and insect attack. It’s wood all the way down into the dirt at the bottom of your perimeter basement walls, and it works. Wood foundations aren’t nearly as common as masonry foundations (only about 3% of all North American residential foundations are made of wood), but you know you have one when you can see wall studs with plywood on the outside face instead of a poured concrete or block wall. If you see nothing but plywood, wafer board or drywall on the inside face of your wood foundation, it’s possible that insulation and wall board have been installed over the underlying studs of a pressure treated wood foundation. You might also have what’s called a SIPs foundation. That’s entirely different and up next.
Structural Insulated Panel (SIPs) Foundation Walls
This is a specific type of pressure-treated wood foundation that includes structural members and insulation all together. Yes, this is another kind of all-wood foundation. Structural insulated panels have a thick central core of foam, with factory-bonded sheets of plywood on each face. Sounds weak, but the combination is very strong. SIPs are used to create entire houses that are about 3x as strong as stud frame homes. If you can see nothing but a smooth expanse of plywood on the outside and inside walls of your basement, then it might be built with SIPs. This isn’t a common foundation, but it is highly effective and typically well suited to finishing.
++++++++++++++
TECH TIP: What ” and ‘ Mean in the Trade
In those parts of the world that use the Imperial measuring system, the mark “ after a number denotes inches i.e. 3” = 3 inches. The use of ‘ after a number denotes feet i.e. 6’ = 6 feet.
++++++++++++++
Understanding the Radon Gas Threat
Before I go on, you need to understand the issue of radon gas. It can matter regardless of how your basement is constructed. Radon is a colourless, odourless radioactive gas that occurs naturally in the soils and rocks of some regions and it’s the leading cause of lung cancer among non-smokers. For every person who dies in a house fire or by carbon monoxide poisoning, six people die from preventable radon exposure. It’s a big deal, but only in some regions. If even small quantities of uranium are in the soil around your house, it can lead to the presence of radon gas that seeps into your basement through cracks, openings for pipes and even around basement windows.
According to government reports based on testing of 14,000 homes, about 6% to 7% of the population lives in houses with radon levels above the current health guidelines of 200 becquerels per cubic metre (Bq/m3 is the international measurement) or 5.4 pico curries per cubic litre (pCi/L is the most common US equivalent). 1 pCi/L equals 37 Bq/m3. Opinions differ on the dangers posed by radon, with some organizations claiming that there is no safe level of radon. Background levels of the gas in the open air range from 5 to 15 Bq/m3. Regardless of whether or not you’re finishing your basement, radon is worth testing for in your home. This is even more important if you’ll be having a finished basement that you’ll spend lots of time in. Radon can affect the air in your entire house, but concentrations will be highest in the basement because that’s where it enters. Don’t panic since it takes years of radon exposure to have harmful effects, but don’t ignore the radon threat either.

So, what’s the prudent thing to do as far as radon is concerned? Two things: testing and (if necessary) the installation of a radon mitigation system. Depending on where you live, there may be no radon in your soil and your basement or there may be lots. Many landscapes simply have no uranium and therefore no radon. Ask around if you like, just realize that not all professional builders are always aware that the radon hazard exists in their area. This is why testing makes sense and it’s easy. These days some very effective and economical hand-held radon detectors are available. Click here to find an excellent model that’s also reasonably priced.
One of the best things about equipping yourself for DIY radon testing is that you can monitor different rooms regularly. Professional radon testing is an option too, but it can’t give you the same long-term analysis because a professional isn’t present all the time to take multiple readings.

So, what can you do if you find damaging levels of radon? The only solution is to have a radon mitigation system installed in your home. Ideally this should happen at the earliest stages of the basement finishing process (if you don’t already have one), and it operates something like a large vacuum system that draws air (and radon) from the soil underneath and around your basement. Cost for installing a radon mitigation system runs around $2000.
The downloadable illustration here shows the parts of a radon mitigation system and how it all fits into the home. If your basement tests high for radon, be sure to print out this illustration and learn about the technology before having a radon mitigation system installed in your home.The aim of all these systems is the same – to create an area of continuous negative air pressure in the soil beneath the basement floor and outside the walls. If negative pressure is always present, radon can’t rise and enter your home. Installation details matter a lot here, so you need to be your own watchdog if you’re hiring help. Click below for a video tour of a radon system to see how it works and what you need to know to have one properly installed in your home.
VIDEO: Radon Mitigation System Tour
